

Generator Inlet Box Installation: Steps, Wiring and Permits
The storm knocks the power out at 4 p.m. By 6, the generator is running in the driveway and two extension cords are snaking through the sliding door, one to the refrigerator and one to a lamp in the hallway. The door won't close, the cord jacket is pinched in the frame, and someone has to remember not to trip over it in the dark.
A generator inlet box replaces that whole arrangement with a weatherproof receptacle on the outside wall, wired back to your panel through transfer equipment, fed by one properly rated cord.
That's where most guides stop, and it's too early. The inlet is a connection point, not a safety device. What keeps your house and the line crew safe is the equipment between that receptacle and the panel, how the neutral is bonded, and whether the panel can accept the right gear at all. Get those three decisions wrong and the inlet is just a tidier version of the cord through the door.
Table of Contents
Inlet Box and Transfer Equipment Compared - Match the inlet amperage to the generator's real output
Placement and Clearance Rules Before You Mount - The distance tradeoff that shapes the whole layout
Grounding and Neutral Bonding Decisions - What to verify at commissioning
How to Wire and Mount a Generator Inlet Box - The sequence, step by step - What the test record should contain
Permits, Inspections and Installation Costs - Why the cheapest placement can cost the most
Operating the Inlet Safely During an Outage - The outage checklist to post by the panel
Inlet Box and Transfer Equipment Compared
A generator must never be connected directly to a building's electrical system unless a qualified electrician has installed a transfer switch. The OSHA portable generator fact sheet explains why in plain terms: without utility isolation, electricity travels back through the building wiring, out the service drop, and along distribution lines for considerable distances, where it can electrocute the crews repairing the outage.
The inlet does none of that work. It's a weatherproof male receptacle, usually with a twist-lock collar, that gives the generator cord a fixed place to land. Everything that matters happens downstream.
Component | What It Does | Circuits It Powers | Best Fit |
|---|---|---|---|
Weatherproof generator inlet | Accepts the generator cord connection outdoors | Only through transfer equipment | Connection point for any portable generator setup |
Listed manual transfer switch | Isolates the utility from the generator, switched by hand | Selected circuits chosen in advance | Homes with a short list of must-run loads |
Panel interlock kit | Prevents the main and generator breakers from being on together | Existing panel circuits | Panels with space for a listed interlock |
Automatic transfer switch | Senses an outage and transfers without anyone present | Selected or whole-house circuits | Households that need power when no one is home |
Inlet box alone | Provides a connection point only | None | Never a complete installation |
Most homes land on a 30-amp or 50-amp weatherproof inlet with a twist-lock connection, such as an L14-30 for a 30-amp, 120/240-volt generator, as Anvil Field's portable generator guide describes it. Fifty-amp inlets take over when the load list grows.
Match the inlet amperage to the generator's real output
Divide watts by volts before you buy. A 7,500-watt generator at 240 volts delivers about 31 amps at full output, so a 30-amp inlet cannot carry everything the machine produces. The 50-amp inlet is the honest match, and the cord, breaker and transfer equipment all need the same rating, because the weakest link sets the ceiling for the whole system.
A transfer switch decides which source the panel sees, and there are three legitimate ways to do it: a listed manual transfer switch with selected circuits, a listed interlock for a panel that has one available, or an automatic transfer switch for a house that needs power when nobody's home. What a transfer switch does for a generator covers how each one behaves during an outage.
Before you buy anything: write down the circuits that must run. Furnace, well pump, refrigerator, sump pump, a few lights, the router. That list, not the inlet, decides which equipment you need and what it costs.
Placement and Clearance Rules Before You Mount
A proposed inlet spot can look convenient and still fail the layout. The cord must reach from the generator's operating position without crossing a doorway or running through the house, while the generator must be placed where its exhaust cannot enter the building. The inlet is one part of that system; its location also depends on the transfer equipment and the panel's capacity.
For a portable generator inlet, the 2023 National Electrical Code treatment described in ExpertCE's NEC 2023 course material places the connection outdoors. It also calls for a warning sign near the inlet identifying the type of derived system compatible with the transfer equipment.
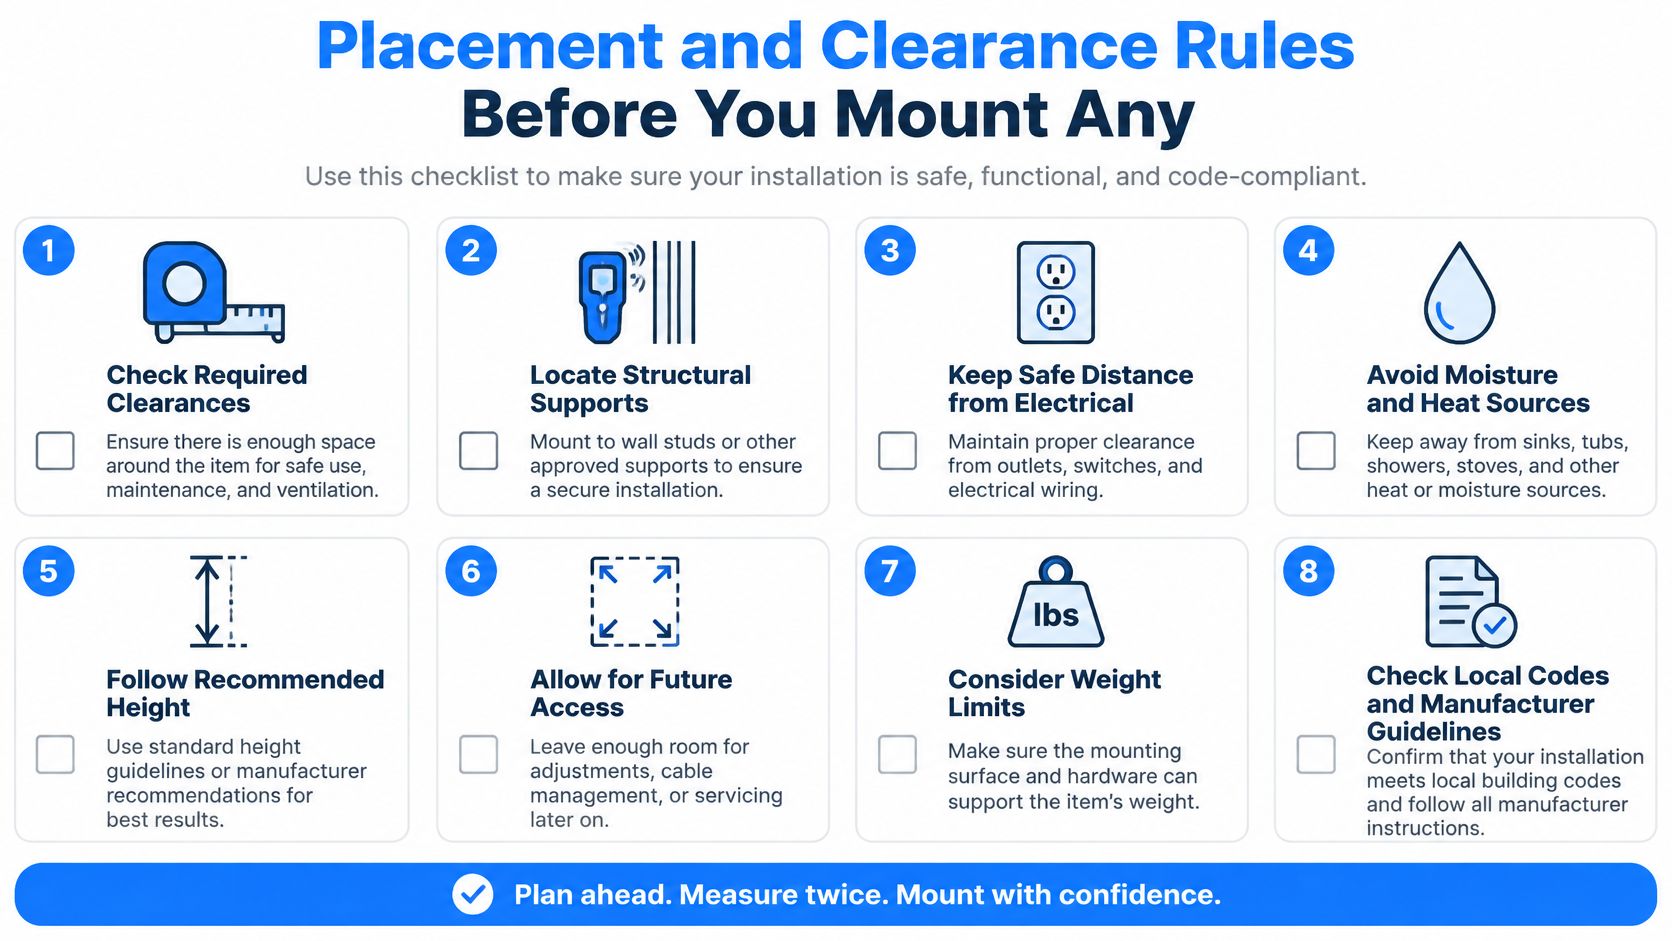
The distance tradeoff that shapes the whole layout
The inlet needs to be close enough for the generator cord to reach without strain or damage. The generator itself must operate away from the house and its openings. Check the generator manual and local requirements for the clearances that apply to your equipment and site; do not treat a single distance as a universal rule.
Factor | Typical Requirement | Why It Matters |
|---|---|---|
Inlet location | Outdoors, where a generator cord can reach it | Keeps the connection point outside the living space |
Distance from openings | Follow the inlet and generator instructions and local requirements | Helps limit exposure to exhaust and fire hazards |
Generator operating distance | Follow the generator manufacturer's instructions and local requirements | Keeps exhaust away from the home |
Warning sign | Near the inlet, naming the compatible derived system type | Identifies the system type for crews and inspectors |
Conductor size and breaker | Set by the one-line diagram and generator output | Prevents overload and overheating |
Weather and mechanical protection | Use an enclosure rated for wet locations; account for grade, snow and possible impact | Helps protect the enclosure from water, snow and physical damage |
Before marking the wall, check the cord route, snow accumulation and drainage around the enclosure. Confirm the cord can reach the planned generator position and is rated for the inlet capacity. Also consider what could strike the box, such as a mower, bin or vehicle door.
Sketch the wall, measure nearby openings, and mark the proposed inlet location. Give that sketch to the electrician so the placement can be checked against the equipment instructions, local code and the planned wiring route.
Grounding and Neutral Bonding Decisions
Before any conductor gets pulled, one question settles the design.
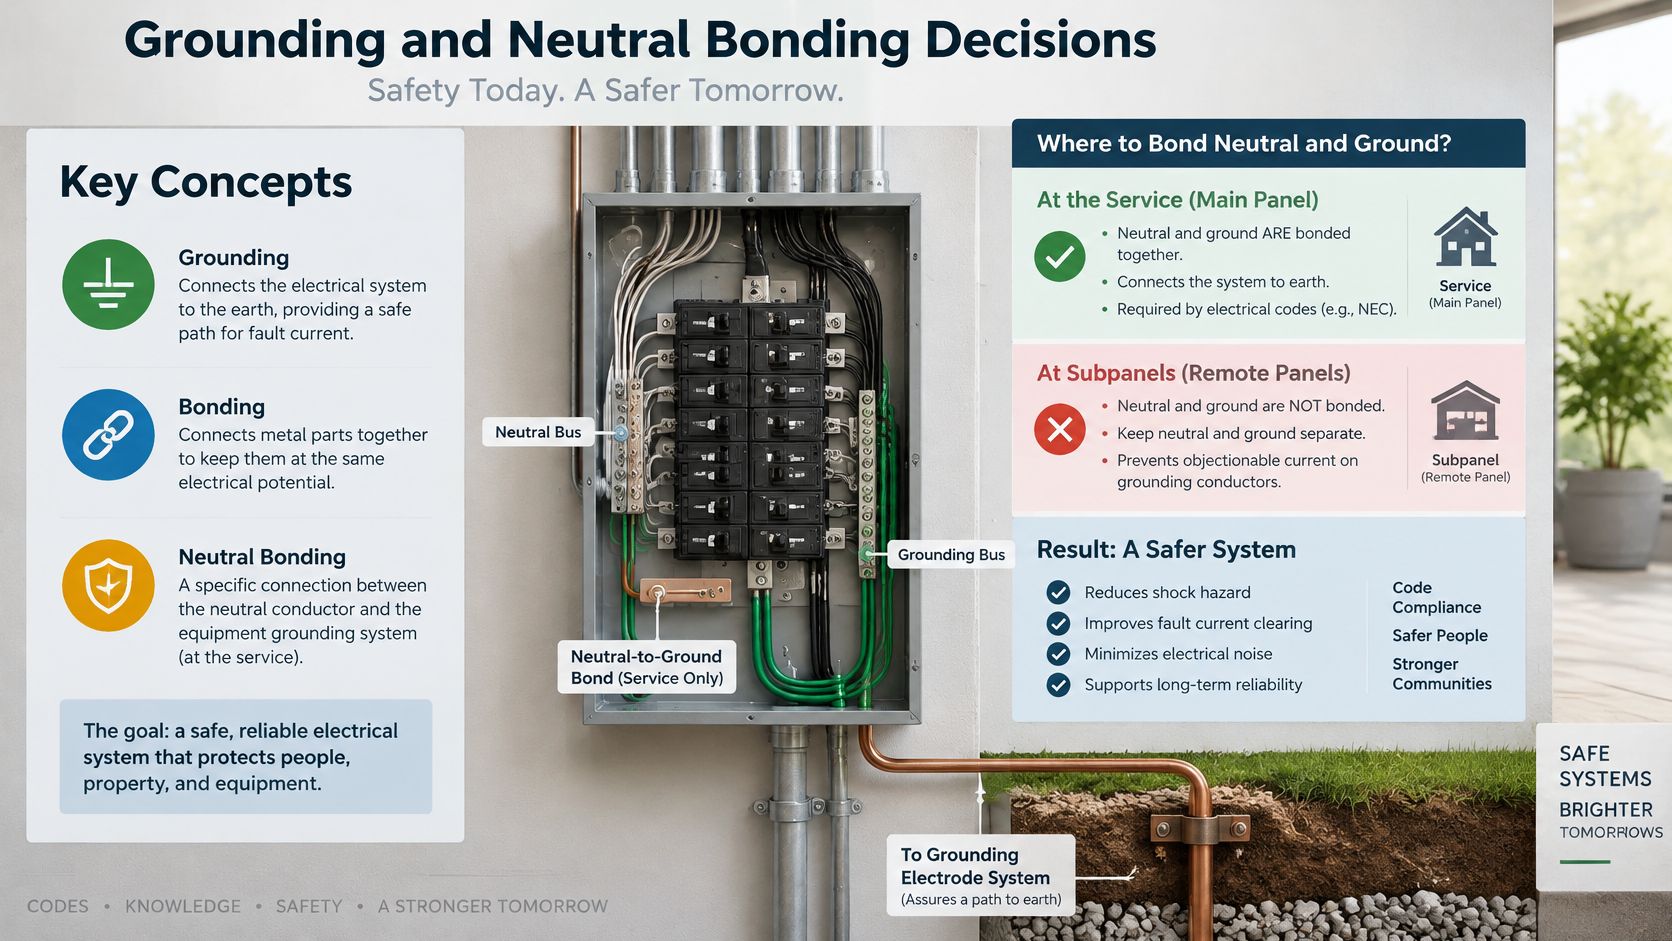
Does the transfer equipment switch the neutral? If it does, the generator is generally treated as a separately derived system, requiring system bonding and grounding at the generator or the first disconnecting means, with an effective equipment-grounding-fault path back to the source. If the neutral is not switched, adding a generator-to-ground bond can create objectionable neutral current and parallel return paths. EC&M's article on generator grounding requirements for transfer switches is clear that the design follows the generator listing, the transfer-switch instructions and the adopted NEC edition, not a rule of thumb.
Record the chosen arrangement on the one-line diagram. It's a design decision, not an installation detail.
What to verify at commissioning
A continuous equipment grounding conductor from the inlet enclosure back to the source.
Enclosure bonding wherever the inlet requires it.
Neutral-to-ground continuity at the intended bonding point only, nowhere else in the system.
No nuisance tripping of ground-fault protection when the transfer happens.
Undersized conductors, incorrect neutral treatment, an unlisted inlet, sloppy weatherproofing, loose terminations and a generator breaker that isn't coordinated with the transfer equipment are the failures that surface at inspection. Overloading is a fire hazard on top of that, which is why commissioning ends with a measured load test rather than a glance at the nameplate.
If your electrician can't name the neutral arrangement and the bonding point before the first hole is drilled, stop the job and get a different electrician.
How to Wire and Mount a Generator Inlet Box
Start with a load and source assessment, not with a drill. The City of Kyle generator installation checklist sets out the sequence a solid job follows: decide whether the inlet feeds selected circuits or a service-rated transfer system, verify the generator's voltage, phase, output current and neutral configuration, then produce a one-line diagram showing conductor sizes, wiring method, overcurrent protection, grounding and bonding points, and the transfer equipment itself.
That diagram is the contract between the design and the wire.
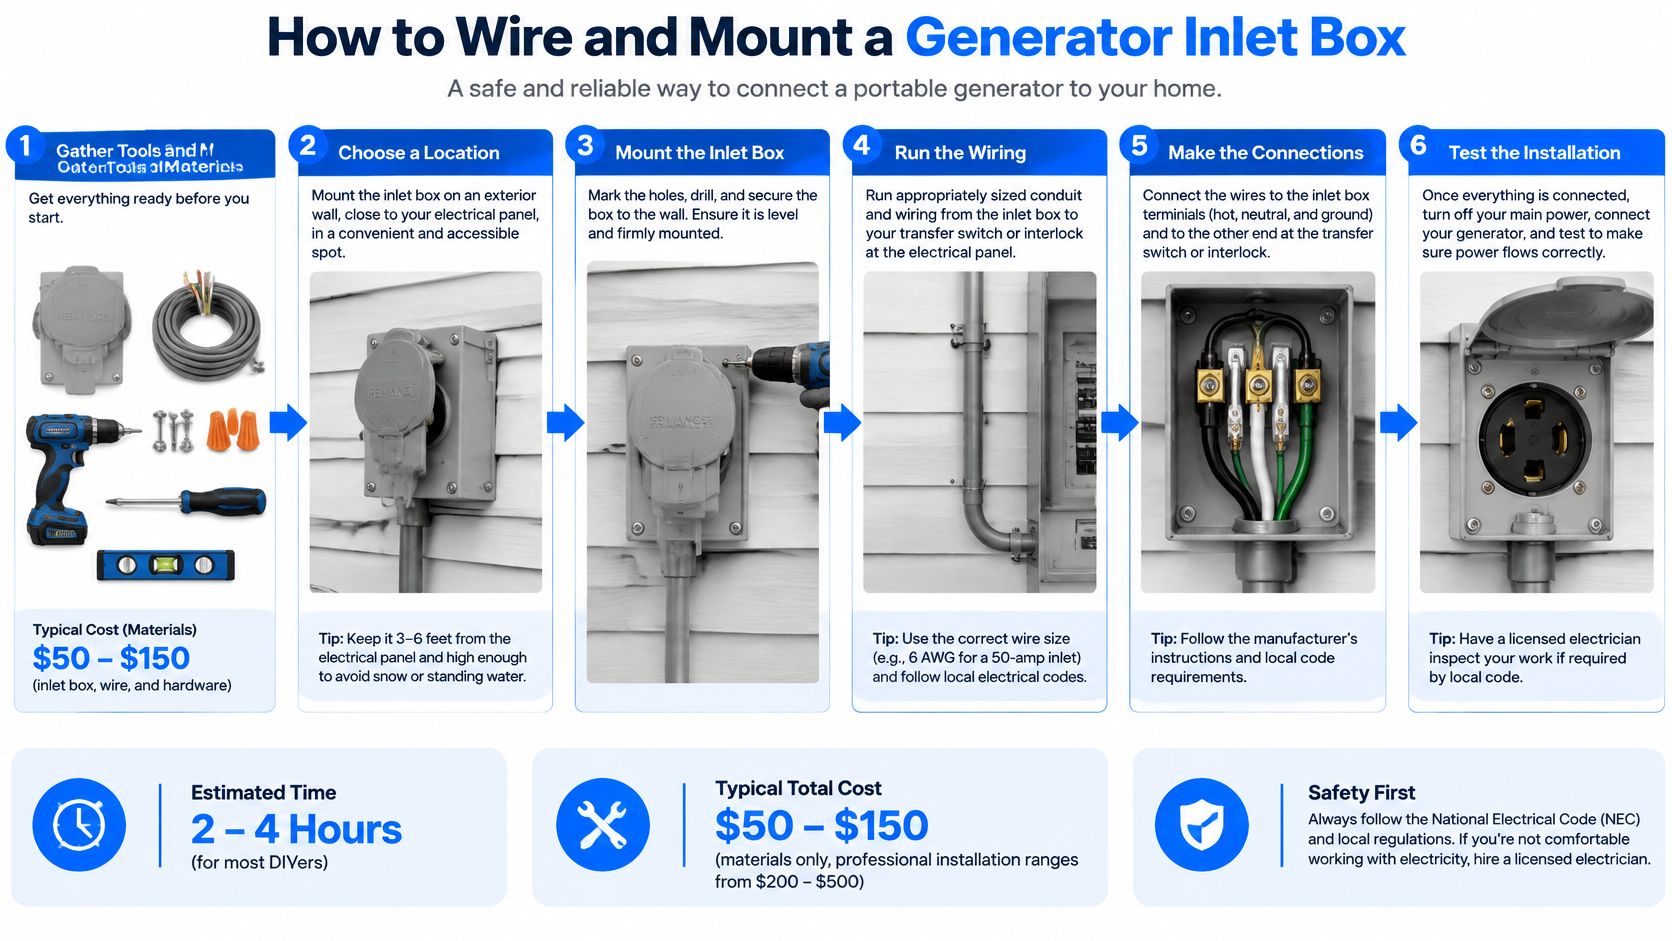
The sequence, step by step
Confirm the inlet and transfer equipment are listed for this use and match the generator's voltage, phase and output current. Mismatched parts are the most common reason a job fails its first inspection.
Draw the one-line diagram and get it reviewed before you buy wire. Conductor sizes, wiring method, overcurrent protection, grounding and bonding points, transfer equipment, all on one page.
Mount the weatherproof inlet where you planned it, with the enclosure draining and clear of the snow line, because a box that holds water fails in its first winter.
Run wet-location-rated conduit and fittings for any exposed conductor, keeping the run short and out of the path of mowers, ladders and vehicles.
Terminate each conductor according to the inlet markings and torque to the manufacturer's specification. Loose terminations heat under load, and a warm lug inside a sealed enclosure is a failure waiting for a cold night. "Tight enough" is not a torque value.
Install the transfer switch or interlock, then label the alternate source and the transfer equipment so the next person can read the system at a glance.
Test before energizing. Continuity, insulation resistance, polarity, grounding and bonding, phase where applicable, and transfer-interlock operation.
Simulate a utility loss and confirm the intended circuits energize with no backfeed. An inlet with nothing behind it will pass every test on that list except this one, and this one is the only test that matters.
What the test record should contain
Write down the torque values used, the insulation resistance readings, which circuits were confirmed live, and the interlock operation result. Sign it, date it, and leave a copy with the permit paperwork. An inspector may ask for it, and the next electrician in that panel will be working blind without it.
Two finishing details separate a professional job from a rough one. Keep the conduit on a straight, accessible path, seal the wall penetration, and leave a drip loop so water runs off the cord instead of into the enclosure. Then label both ends permanently, inlet and transfer equipment, with the type of alternate source.
Permits, Inspections and Installation Costs
Before installation, check the local permit process and what documents it requires. Plan review may ask for conductor material and insulation type, conduit size, trench depth for an underground run, overcurrent protection ratings, grounding and bonding details, source labeling, and manufacturer and UL documentation. Incomplete paperwork can lead to resubmittal delays.
Cost Item | Typical Range | What It Covers |
|---|---|---|
Generator inlet box | $40 to $90, according to Standby Savvy's inlet box guide | The weatherproof inlet part only |
Professional installation labor | $300 to $800, according to Standby Savvy's inlet box guide | Mounting, conduit and terminations by an electrician |
Complete electrician-installed setup | $400 to $1,300, according to The Pricer's cost breakdown | The inlet, labor and typical wiring for the connection |
Permit and inspection fees | Set by the local jurisdiction's fee schedule | The filing and the inspection visit |
Transfer switch or interlock kit | Set by the listing and the number of circuits | The equipment that makes the inlet safe |
The inlet box is only one part of the project cost. A complete setup also depends on the transfer equipment and whether the existing panel can accommodate it. Compare that cost with the cost of a whole-house generator installation when deciding between a portable connection and a standby system.
Why the cheapest placement can cost the most
The CPSC portable generator safety alert warns that backfeeding through an ordinary receptacle can electrocute utility workers and neighbors, and can bypass household circuit protection. An inlet must work with compatible transfer equipment. If the panel cannot accept that equipment, the project may need a different plan.
Older homes in Southeastern Pennsylvania may have split-bus, crowded or obsolete panels. Check panel capacity and transfer-equipment compatibility before choosing an inlet location.
Does the quote include the permit and inspection? Confirm who handles the application and any required corrections.
Does it include a panel assessment if the panel is old or full? Panel capacity can affect the equipment and scope required.
Get the permit scope and any panel work listed in writing before installation begins.
Operating the Inlet Safely During an Outage
A correctly wired inlet doesn't power everything. A portable generator may not start or sustain a furnace, well pump, refrigerator, sump pump, EV charger and electric water heater at the same time, even when the inlet and breaker are right. Large motor loads draw a surge on startup, so bring them on one at a time and add lighting and electronics after.
The Ready.gov power outage guidance puts generators and fuel outdoors at least 20 feet from windows, doors and attached garages. Keep the exhaust pointed away from the house, refuel only with the unit shut down and cooled, and follow the transfer equipment instructions in the order they're written rather than improvising at 2 a.m.
Load management is the habit worth building. Choose the critical circuits in advance, avoid starting the well pump and the furnace blower together, and consider a battery system for sensitive electronics if you're already planning storage. If you're weighing a portable setup against a permanent one, how a standby generator works explains the automatic side of the same decision.
The outage checklist to post by the panel
Generator outside, exhaust clear of doors, windows and vents.
Cord rated for the full inlet capacity, inspected, and run where nobody walks.
Transfer switch or interlock set to the generator position before the generator starts.
Snow cleared from the exhaust and away from the inlet enclosure.
Monthly test run under a real load, so the transfer equipment is known to work before you need it.
Adding an EV charger or battery storage later changes the math, because panel capacity, generator sizing and transfer compatibility stop being separate projects and start constraining each other. Revisit the plan before the new load goes in, not after.
Hire a Licensed Electrician to Finish the Job
A generator inlet is one part of a system. The transfer equipment must match the panel, neutral bonding must be configured correctly, and the panel must have capacity for the intended loads. A licensed electrician can assess those conditions and complete work that meets applicable electrical requirements.
Before signing, confirm these six project details:
License: Ask for the electrician's license information.
Panel compatibility: Confirm the transfer equipment is listed for the panel's make and model.
Neutral and bonding: Ask how the transfer equipment and generator affect the system's neutral-bonding arrangement.
Permits and inspection: Confirm who is responsible for determining permit requirements and arranging any required inspection.
Test procedure: Ask what checks will be performed on the inlet and transfer equipment before the system is put into service.
Written scope: Make sure the quote identifies the equipment, installation work, and any panel changes included.
Amp'd Energy Solutions' licensed electricians assess the existing setup and explain panel upgrade or full service replacement options when needed. The company also sizes, installs, troubleshoots, and maintains whole-house generators. That assessment helps determine whether the proposed inlet and transfer equipment fit the panel and the generator.
Book a site assessment with your circuit list, a photo of the panel, the generator nameplate data, and your proposed inlet location. Amp'd Energy Solutions serves Southeastern Pennsylvania. Visit Amp'd Energy Solutions to arrange an assessment.
Comments