

GM Ultium Powerup Level 2 Charger Installation Guide
You've got a new GM EV in the driveway, the PowerUp 2 box sitting in the garage, and a free stretch of wall that looks like the easy part. The harder question is whether the panel can carry a continuous Level 2 load, and whether a permit, a landlord, or the utility has to sign off before anyone opens a wall.
Mounting the charger is a short job once a dedicated circuit exists. Building that circuit, and settling who owns it, is what stretches the calendar and the budget on a GM Ultium PowerUp Level 2 charger installation.
I would start with three numbers from the panel, not with a stud finder.
Table of Contents
PowerUp 2 Electrical Specs to Check First - Why 48 amps needs a 60 amp breaker
Check Your Panel and Service Capacity - Three outcomes, one calculation
Permits, Inspections and Who Pays - Incentives and shared parking
How to Install the Charger Step by Step - What a clean finish looks like
Hiring an Installer and Building the Scope Sheet - What belongs on the sheet - How to read a quote
PowerUp 2 Electrical Specs to Check First
Before the PowerUp 2 leaves the box, write the nameplate ratings onto one site sheet. A homeowner or property manager can confirm each item at the panel and at the planned parking spot without opening a wall.
Specification | PowerUp 2 value | What it means for your site |
|---|---|---|
Supply voltage and frequency | 208/240 V AC, 60 Hz | Panel must supply single-phase 240 V |
Maximum charging current | 48 A | Sets the continuous load used for sizing |
Maximum power output | 11.5 kW | Largest new load the service has to carry |
Branch breaker | 60 A, two-pole | Breaker, conductors and raceway are sized as one circuit |
Connection method | Hardwired direct 240 V | The final connection is fixed wiring |
Mounting height | 600 to 1,200 mm | Check clearance to walls, garage doors and walkways |
Installation requirement | Licensed electrician | Required by manufacturer guidance and local code |
Why 48 amps needs a 60 amp breaker
EV charging is a continuous load. Code sizes that load at 125 percent, so 48 A times 1.25 lands on 60 A. That is why the job is priced and permitted around a 60 A two-pole circuit even though the charger tops out at 48 A. The breaker, conductor size and raceway are chosen as one assembly.
If connector choice is still open, a Level 2 J1772 charger overview shows why the plug decision belongs in the same conversation as circuit capacity.
GM's product information states that new Level 2 installations require a direct, hardwired 240 V connection and professional installation by a qualified electrician, and that the maximum charging rate requires a 60-amp circuit breaker. On a 100-amp service or a crowded panel, that added load can push the project toward load management, a subpanel, or a service upgrade before the wall unit is mounted.
Practical rule: Record service amperage, open two-pole space, and panel-to-charger distance on the site sheet. Those entries let an installer price the job as a circuit, a panel correction, or a service upgrade from facts rather than guesses.
Check Your Panel and Service Capacity
Most budget surprises start at the main breaker, not at the charger. Read the service rating printed there, count open spaces for a two-pole breaker, and ask whether the calculated load still has room under that rating.
Service or panel situation | Typical outcome | What usually changes |
|---|---|---|
200 A service with spare breakers and spare capacity | Direct install on a 60 A two-pole breaker | Breaker, wire run and charger mounting only |
100 A service or older panel with no spare slots | Service or panel upgrade likely | Larger service, new panel, utility coordination |
Subpanel fed from the main panel | Solves space, not capacity | Main service still has to carry the added load |
Detached garage or long cable run | Longer conductors and conduit | Larger wire and trenching set by the route length |
Three outcomes, one calculation
A 200 A service with a modern panel and spare slots usually accepts the new two-pole breaker after a normal load calculation. Heating, cooking, and air conditioning are already in that math. If they leave headroom, the added work is the breaker, the wire run, and the mount.
A 100 A service, or an older panel with no spare slots, usually cannot absorb an 11.5 kW continuous load on top of those same appliances. The installer adds existing loads, applies the calculation your local code requires, and checks whether the new charger fits. When it doesn't, the path is a larger service, a new panel, and time with the utility. That is the line item that moves a one-day job into a multi-week project.
A subpanel fixes a space problem and nothing else. It still draws from the main service. Putting the breaker in a garage subpanel does not create amperes the utility never delivered.
A long run to a detached garage changes wire size and often means trenching. Price that route as its own line, separate from the charger.
Ask the electrician to write down the service size, the calculated load before and after the charger, the proposed breaker, the wire-run length, and whether a service upgrade is required. Those notes are the scope later quotes should match. If the calculation points to a new service, a home electrical panel upgrade is the project to plan, not a side note on the charger invoice.
Permits, Inspections and Who Pays
A permit does not appear because you bought a charger, and a rebate does not appear because you live in Pennsylvania. Treat each layer as its own quote and its own sign-off: charger hardware, new circuit, permit, utility coordination, and any panel or service upgrade.
In Southeastern Pennsylvania the permit usually comes from the local municipality. The electrician normally pulls it and books the inspection, so the quote should name that person. If the paperwork is "included" with no name attached, you don't yet know who calls the inspector when the rough-in is ready.
Philadelphia runs its own permit office. Ask whether your address qualifies for a faster review before you assume a long wait, and don't assume a suburb follows the same process. A township that handles your neighbor's job in a week can take a month on yours.
Incentives and shared parking
Don't budget a discount you have not confirmed in writing. Before you count on a rebate, ask your township and your utility whether a program applies to your account, and keep the answer on file for the quote comparison.
Shared sites fail on ownership more often than on wiring. A 2025 property-management survey reported that only 2% planned to install EV chargers despite demand, with 53% naming cost as the leading barrier. Get written approval from the owner or property manager before you order hardware.
Settle these points before anyone orders parts:
Permit: Who pulls it, and whose name is on the application.
Inspection: Who schedules it, and who meets the inspector.
Ownership: Who owns the charger after the job, and who can unplug or lock it.
Access and payment: Who pays for the circuit, and who may use the stall.
Building work: Who approves trenching, a wall penetration, or a new meter.
The same list covers a workplace charger serving employees, a small fleet, or customers. The piece that changes is access. One circuit serving several drivers needs a posted rule for who may charge and how they pay, or the first argument arrives before the first full charge.
How to Install the Charger Step by Step
Nothing gets cut until the site survey is written down. GM's PowerUp 2 user guide requires licensed installation and compliance with applicable NEC/CEC and local rules. The sequence below is what a careful crew does on site.
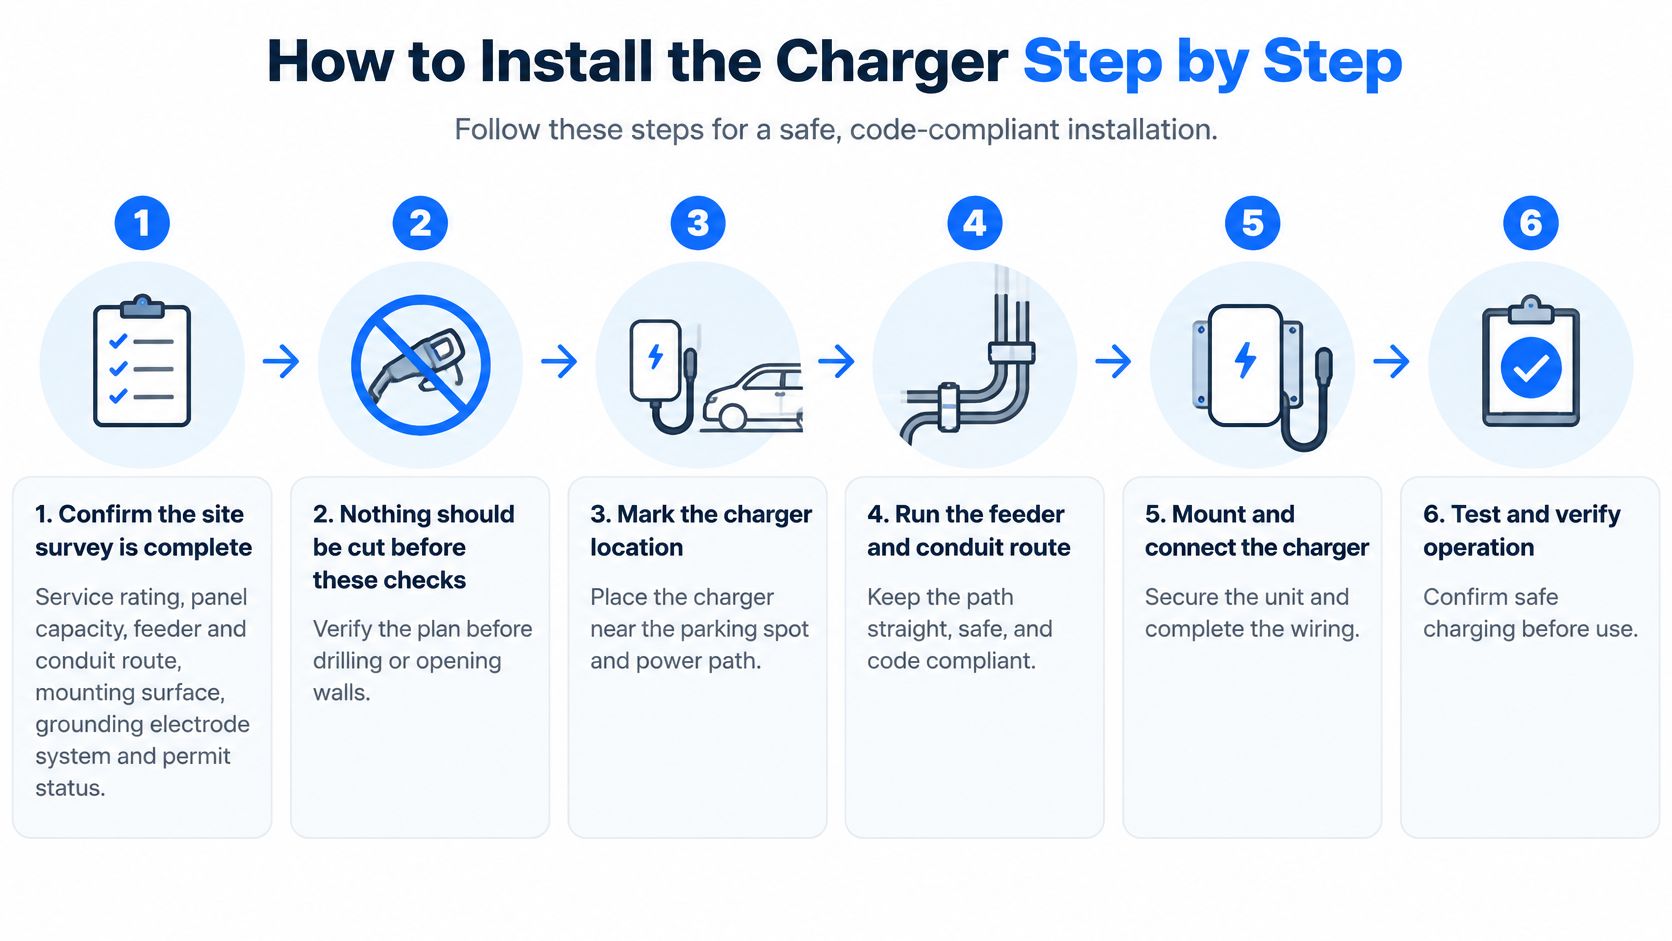
Confirm the survey. Service rating, panel capacity, feeder and conduit route, mounting surface, grounding electrode system, and permit status go on paper first. A wrong route discovered after drywall is opened is how a half-day job becomes a repair.
De-energize and lock out. The panel is dead, locked, and tagged before any breaker or conductor is touched. A "quick look" with the main still on is how people get hurt.
Install the raceway and conductors. Size them for the 60 A circuit and keep the route short and protected from vehicle doors, mowers, and foot traffic. Every extra bend is a pull you will regret.
Land the equipment ground. Provide an equipment grounding conductor or an approved grounded metal wiring method. A missing ground is a common reason an inspection fails, and it is not something to "add later."
Mount clear of doors and walkways. Position the unit where a swinging garage door, a car door, or daily foot traffic will not strike it, and leave roughly 6 inches of conductor at the unit so it can be serviced or replaced without a new pull.
Terminate and torque. Connect protective earth, L2, and L1 to the marked terminals and torque each one to the manufacturer's value. Loose lugs are a frequent source of heat, and finger-tight is not a torque spec.
Commission before the car. Energize and commission at 208/240 V, confirm the charger reports the expected status, and only then connect the vehicle.
What a clean finish looks like
The breaker holds under load, the charger shows a ready status, the ground path tests intact, and the cord reaches the inlet without crossing a walkway as a trip hazard. Conduit fittings seat fully at the enclosure, terminations stay tight, and the panel closes with the new 60 A breaker labeled. That is the moment to request the final inspection, not after a week of unofficial charging.
Mistakes That Fail Inspections or Unsafe Charging
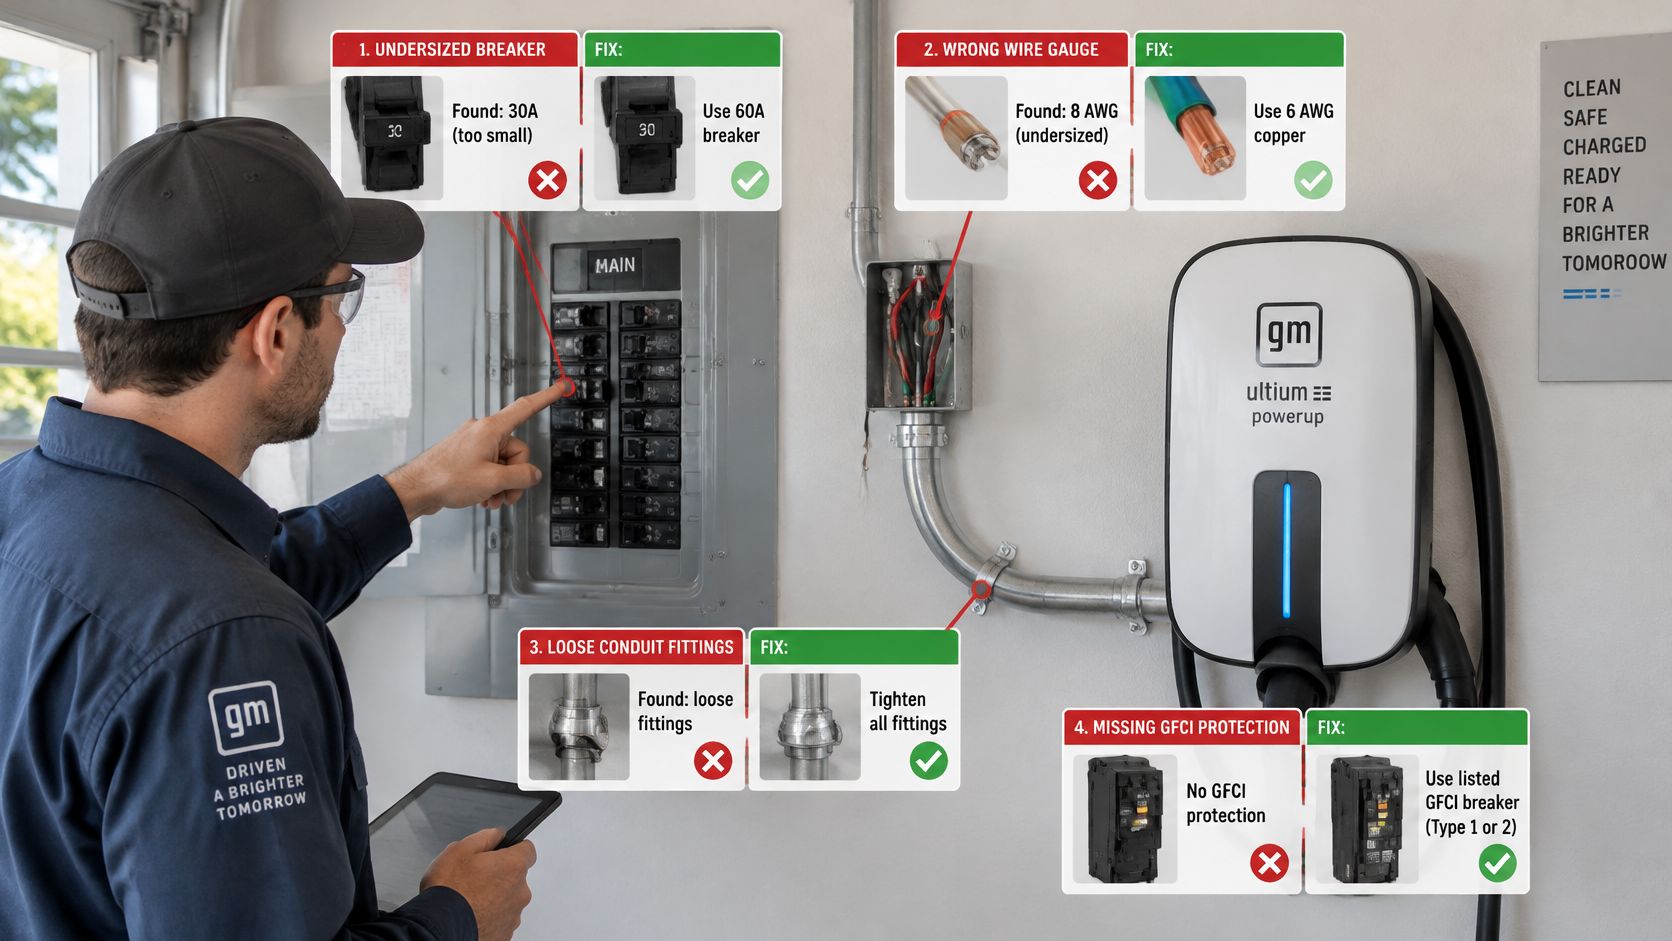
A PowerUp 2 can pass inspection in April and still misbehave in July. A 40 A or 50 A breaker often holds a 48 A charge on a cool evening, then nuisance-trips on the first hot afternoon once the garage air and the conductor both run warm. That trip is a sizing problem, not a charger fault, and it is the kind of failure that shows up after the electrician is paid. Most failed inspections and early charger deaths trace back to a short list of causes:
Failure mode | What it looks like | The fix |
|---|---|---|
Breaker undersized for a continuous 48 A load | Nuisance trips on warm days or during long sessions | Put the 60 A two-pole breaker and matching wire on the permit drawing before parts are ordered |
Plug-in arrangement for daily charging | A quote proposing a receptacle or cord setup | Reject it; this unit is a hardwired device, and sustained current at a weak contact builds heat |
Water at the conduit fitting or connector | Corrosion inside the housing and an early failure | Enclosure rated for the location, a listed watertight hub, a sealed wall penetration, and a drip loop |
New circuit never labeled | The inspector cannot match the breaker to the permit | Update the panel directory and label the breaker with the circuit it feeds |
Each row is a few dollars and a few minutes at rough-in. Found months later, each one costs a return visit.
Hiring an Installer and Building the Scope Sheet
Send the same written scope to two or three licensed electricians so the quotes compare line by line. A phone price with no panel visit is a guess.
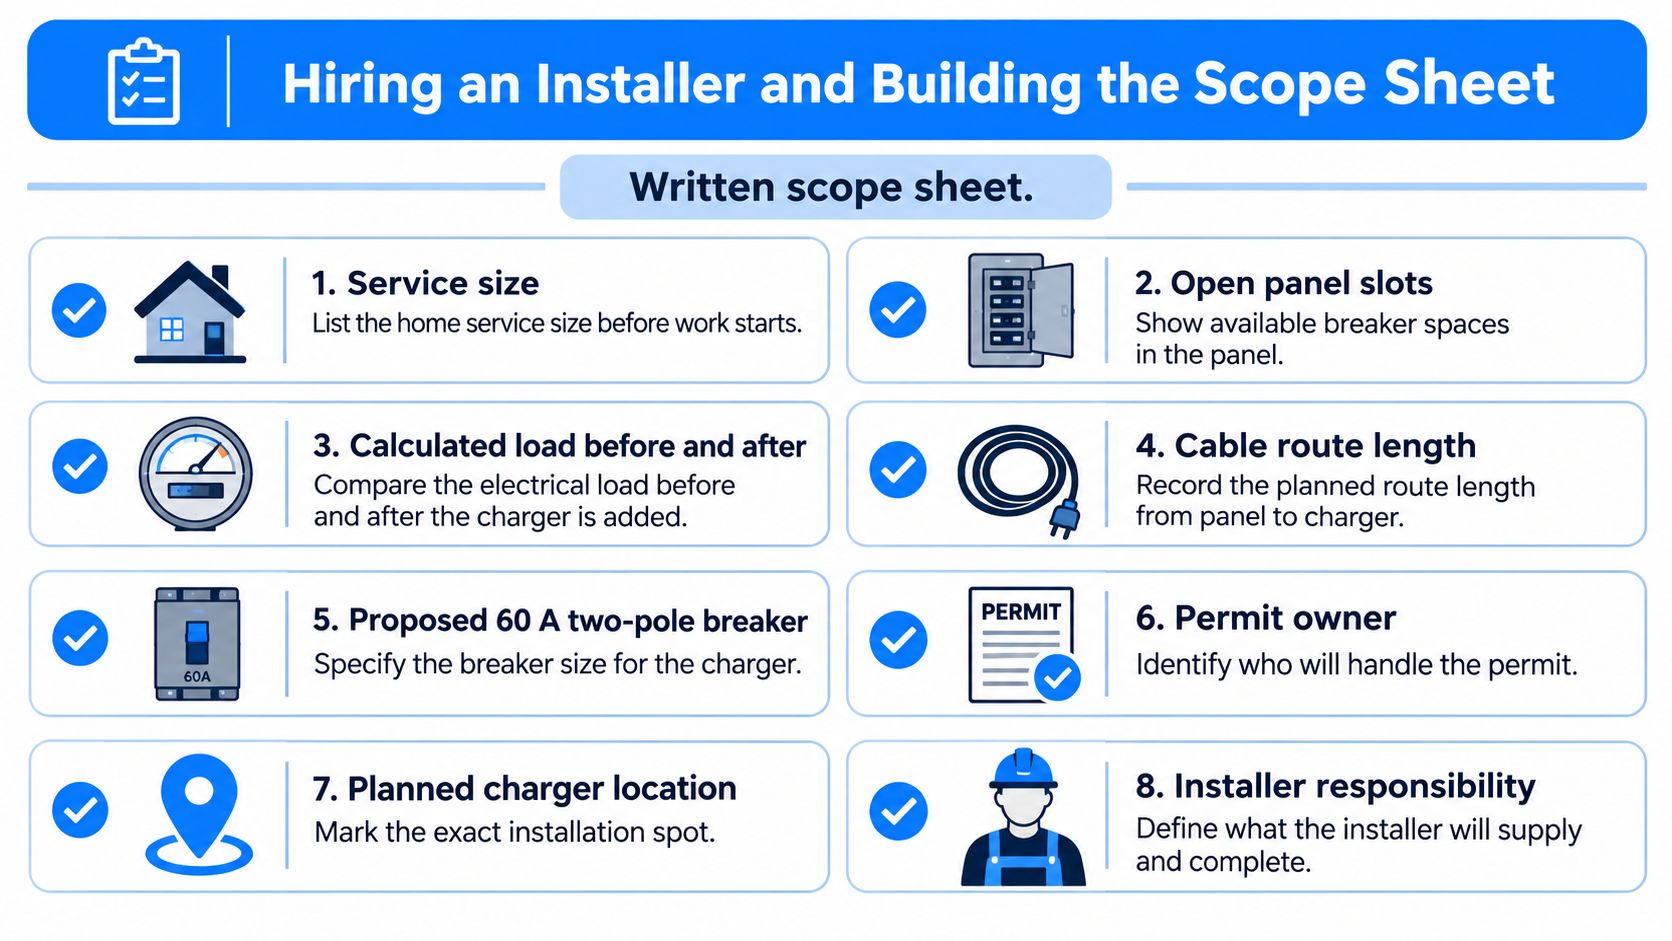
What belongs on the sheet
Service size: The amperage on the main breaker, written before anyone prices the job.
Open panel slots: Spaces that can take a two-pole breaker, not just empty knockouts.
Calculated load before and after: The installer's math, so you can see whether the charger fits.
Cable route length: Panel to charger, including vertical rises and any trench.
Proposed 60 A two-pole breaker: Named on the sheet, not left as "appropriate breaker."
Permit owner: The person who files and who meets the inspector.
Planned charger location: Marked so two bidders are pricing the same wall.
Upgrade flag: Yes or no on a panel or service change, as its own line.
How to read a quote
A comparable quote names the charger model, breaker size, wire type and run length, who pulls the permit, inspection, warranty, and cleanup. A bid that omits the 60 A circuit or the permit is not comparable to one that includes them. Show any panel or service upgrade as a separate line, or the "charger price" conceals the actual job.
A GM Energy product page lists the PowerUp 2 at $899 MSRP and states that professional installation is required. Hardware is the known number. Labor, materials, and any service work are the variable, and no published range replaces two written quotes from a site visit.
Amp'd's electricians are licensed. Confirm any bidder the same way, and check the license against the state record. Ask whether they have installed GM Level 2 chargers and what they do when a panel fails the load calculation. Credentials for this work are covered in our note on EV charger installation certification.
Walk away from a promise of a quick plug-in in place of a dedicated circuit, a firm price with no site visit, or a refusal to put permit responsibility in writing. Expect a look at the panel before a firm price on anything beyond a straightforward install. We can review your scope sheet before you book so the quotes you collect are pricing the same work.
Amp'd Energy Solutions installs Level 2 chargers for homes and workplaces across Southeastern Pennsylvania, including panel checks, dedicated circuits, and service upgrades when the existing panel can't carry the load. If you are planning a GM Ultium PowerUp Level 2 charger installation, bring your service size, open slots, and charger location to a free consultation. Visit Amp'd Energy Solutions or call 267-450-6992 to schedule that visit or request a quote.
Comments