

Tesla Wall Connector 48 Amp Circuit Requirements Explained
A 48-amp Tesla Wall Connector needs a dedicated two-pole 60-amp breaker on a 240-volt circuit, because the circuit must carry 125% of the 48-amp continuous charging load. That surprises many homeowners, because the breaker is not sized to the number on the charger. It's sized to the number the charger can draw for hours without a pause.
That one distinction changes the whole job. You're not just shopping for a breaker and a length of wire. You're asking whether your service, your panel, and everything already running in the house can carry a new 60-amp branch circuit safely, or whether a lower Wall Connector setting is the smarter fit.
Table of Contents
48-Amp Circuit Requirements at a Glance - The reference numbers - Make the table earn its place
Breaker Pairings for Each Charger Setting - Why the breaker is always bigger
Wire, Ground and Conduit Variables - Material and terminals come first - Length, heat, and crowding - Conduit and the ground wire
How to Check Whether Your Panel Has Capacity - Six steps, in order - A tight case, worked through
Choosing Full Power, a Lower Setting, Load Management or an Upgrade - Three situations
Code-Compliant Installation Checklist for 48 Amps - The checklist - Cases that add requirements
Common Mistakes That Trip Breakers or Fail Inspection - Reading a trip
Record the Decision and Hand Off the Scope - Put the unknowns on the page
48-Amp Circuit Requirements at a Glance
A 48-amp setting is a service decision before it is a charger setting. The working stack is exact: 60-amp two-pole breaker, 240-volt dedicated circuit, 6 AWG copper conductors where the terminals allow, 4 AWG aluminum where allowed, and a 10 AWG copper equipment grounding conductor. Then that stack has to fit beside every load already on the service.
The reference numbers
Requirement | Value for 48 A | Basis |
|---|---|---|
Breaker | 60 A, two-pole, 240 V | 125% continuous-load rule for the 48 A Wall Connector configuration |
Maximum output | 48 A, about 11.5 kW | 240 V x 48 A = 11,520 W |
Continuous-load minimum | 60 A circuit capacity | 48 A x 1.25 = 60 A |
Copper conductors | 6 AWG | Electrical code ampacity table for a 60 A circuit; terminal rating can change the size |
Aluminum conductors | 4 AWG | Electrical code ampacity table for 60 A; terminal rating can change the size |
Equipment grounding conductor | 10 AWG copper | Electrical code grounding table for a 60 A breaker |
Read the output row as delivered power. 240 volts x 48 amps = 11,520 watts, or about 11.5 kW, before the vehicle limits the charge on its own.
Make the table earn its place
Dedicated circuit: The circuit serves only the charger. No outlet, light, or second appliance shares it.
Panel capacity: Your calculated whole-home load, charger included, must fit within the service size. An open breaker slot gives you a place to land conductors, while the load calculation tells you whether the service can carry them.
Permit and inspection: The local municipality approves the work before it starts and inspects it after.
Use these values as the starting point for the load calculation; the calculated service load decides whether 48 A stays at 48 A.
If one gate fails, change the Wall Connector setting, the breaker pairing, or the service equipment before pulling wire.
Breaker Pairings for Each Charger Setting
The same 125% rule produces every pairing, so you can check any setting yourself. Tesla's specification for the top end is clear: the Tesla Gen 3 Wall Connector installation specification specifies a 60-amp circuit breaker for the 48-amp maximum-output configuration. Work down from there and each step follows the same arithmetic.
Charger setting | Breaker | Power at 240 V |
|---|---|---|
48 A | 60 A, two-pole | about 11.5 kW |
40 A | 50 A, two-pole | about 9.6 kW |
32 A | 40 A, two-pole | about 7.7 kW |
Why the breaker is always bigger
EV charging pulls its full current for hours at a stretch, and electrical code treats a sustained load like that as continuous. Continuous loads get headroom so the wire and breaker never sit at their absolute limit all night. The arithmetic stays identical at every step: 48 x 1.25 = 60, 40 x 1.25 = 50, and 32 x 1.25 = 40.
Power follows the same multiplication. 240 x 48 = 11,520 W, about 11.5 kW. 240 x 40 = 9,600 W, about 9.6 kW. 240 x 32 = 7,680 W, about 7.7 kW. For a wider view of where these settings sit among home charging options, this guide to how many amps a Level 2 EV charger uses puts them in context.
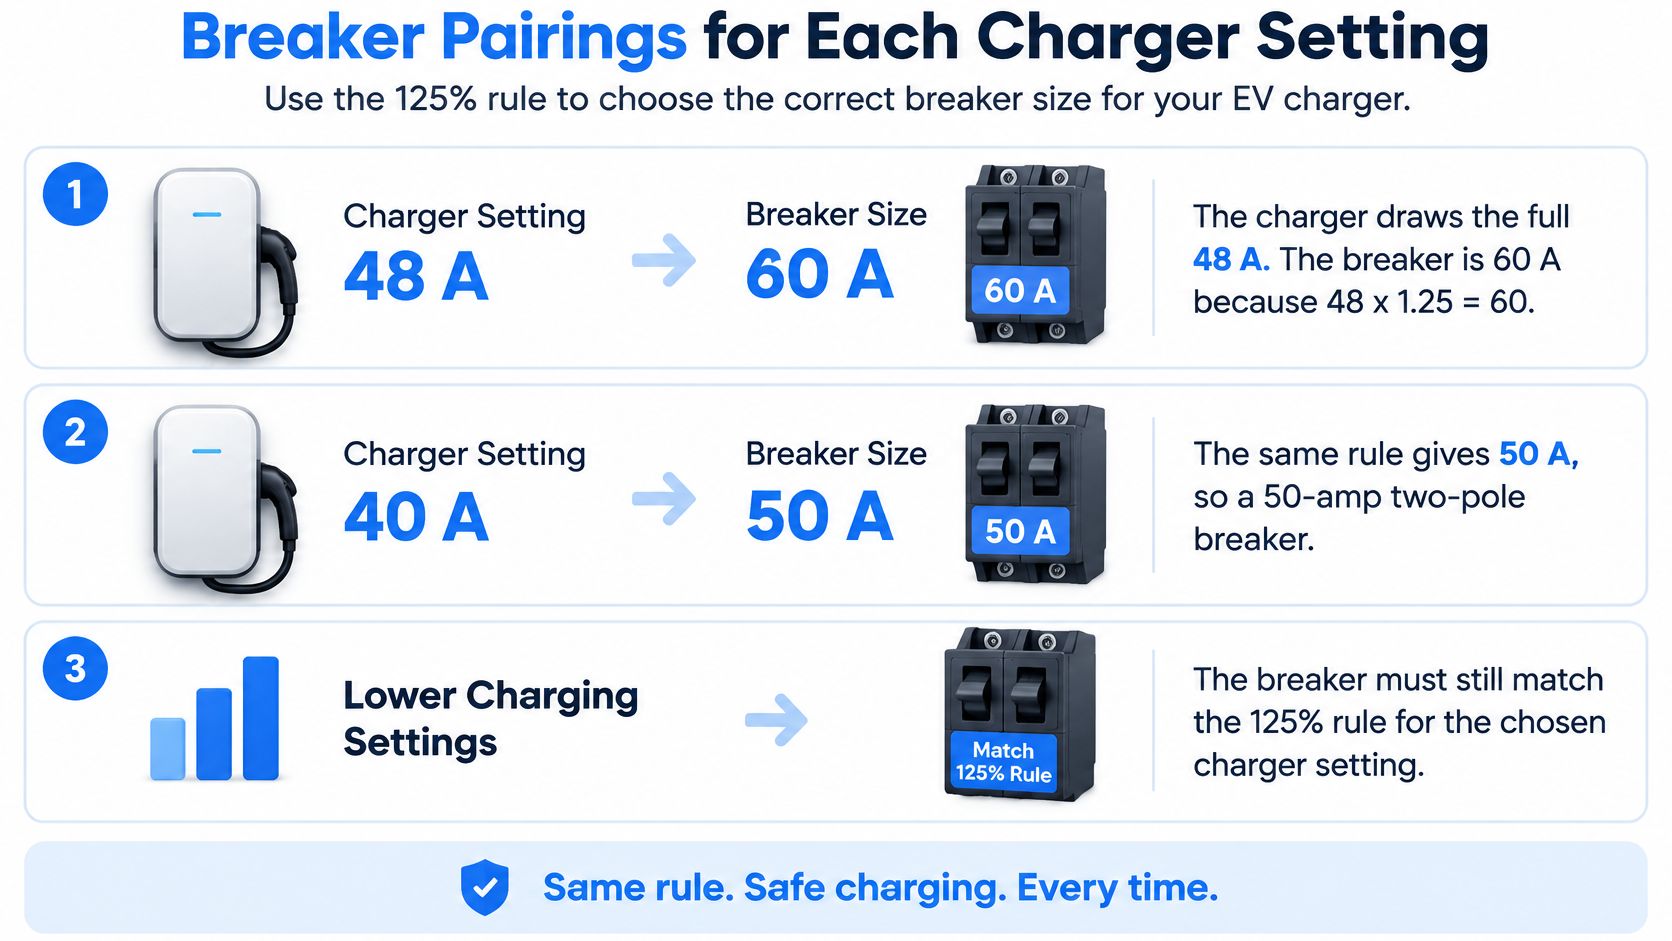
The breaker protects the wire and the circuit from sustained overload, and it must be sized to the setting it serves. Setting and breaker move as a pair. Change one and you recheck the other against the 125% rule before the work continues.
Practical rule: Set the charger to a current the breaker supports, never the other way around.
A 40-amp setting on a 40-amp breaker is the pairing that trips people up, because the numbers look matched. They aren't. The breaker has to carry 125% of a continuous load, so 40 x 1.25 = 50, which means that combination needs a 50-amp breaker and wire sized for it. The clean fix costs nothing: dial the charger down to 32 A, a setting the existing 40-amp breaker fully supports.
Wire, Ground and Conduit Variables
The baseline from the quick table is 6 AWG copper or 4 AWG aluminum for the current-carrying conductors, with a 10 AWG copper equipment grounding conductor. That's where sizing starts. It isn't always where it ends, because five site conditions can push you one size up.
Variable | Effect on the conductor | What to check |
|---|---|---|
Conductor material | Aluminum needs a larger size than copper for the same 60 A | Conductor type on the panel and charger documents |
Terminal temperature rating | Lower-rated terminals reduce allowable ampacity | Terminal rating on the breaker and the charger |
Run length | Long runs can cause voltage drop and may call for one size up | Route length measured along the actual path |
Ambient temperature | Hot spots such as attics or sun-exposed walls reduce ampacity | Where the run passes through heat sources |
Conductors in one conduit | More conductors raise the fill and derating requirements | Count every conductor in the raceway before pulling wire |
Material and terminals come first
Aluminum carries less current than copper at the same size, so it steps up to 4 AWG where copper uses 6 AWG. Both must land on terminals rated for the conductor material and for the temperature column you used to size the wire. A lower terminal rating reduces what the conductor is allowed to carry, even if the wire itself looks big enough.
Length, heat, and crowding
Voltage drop grows with distance. A panel across the house from the garage can make a one-size-up conductor the right call, so the car sees proper voltage at the end of the run. Heat works against you too. A run through a summer attic or along a sun-baked wall carries less than the same run through a cool basement, and conductors bundled together in one raceway heat each other.
Conduit and the ground wire
For the raceway itself, the Tesla Gen 3 Wall Connector conduit guidance specifies a default conduit size of 3/4 inch, or 21 mm, while 1 inch, or 27 mm, conduit is acceptable if needed. Go larger when the pull is tight, the route has several bends, or you're upsizing conductors. Conductors must pull through without damage, and the conduit fill limit still applies.
The equipment grounding conductor does a different job from the charging wires. It carries fault current back to the source so the breaker trips fast, and it's sized from the breaker rating, not from the charging current. Before anyone buys wire, record the route length, the conduit path, the terminal ratings at both ends, and every conductor already in the raceway.
How to Check Whether Your Panel Has Capacity
Panel capacity works like a household budget: open breaker spaces are the blank checks, and the calculated load is the money already committed. An empty slot proves only that a breaker will physically fit. The service calculation decides whether the power behind it exists. The Tesla Wall Connector manual treats charging as a continuous load, so the circuit must be sized to at least 125% of the configured charging current. That is why the breaker pairings from the earlier section enter the math at their full rating rather than the amp setting on the charger.
Six steps, in order
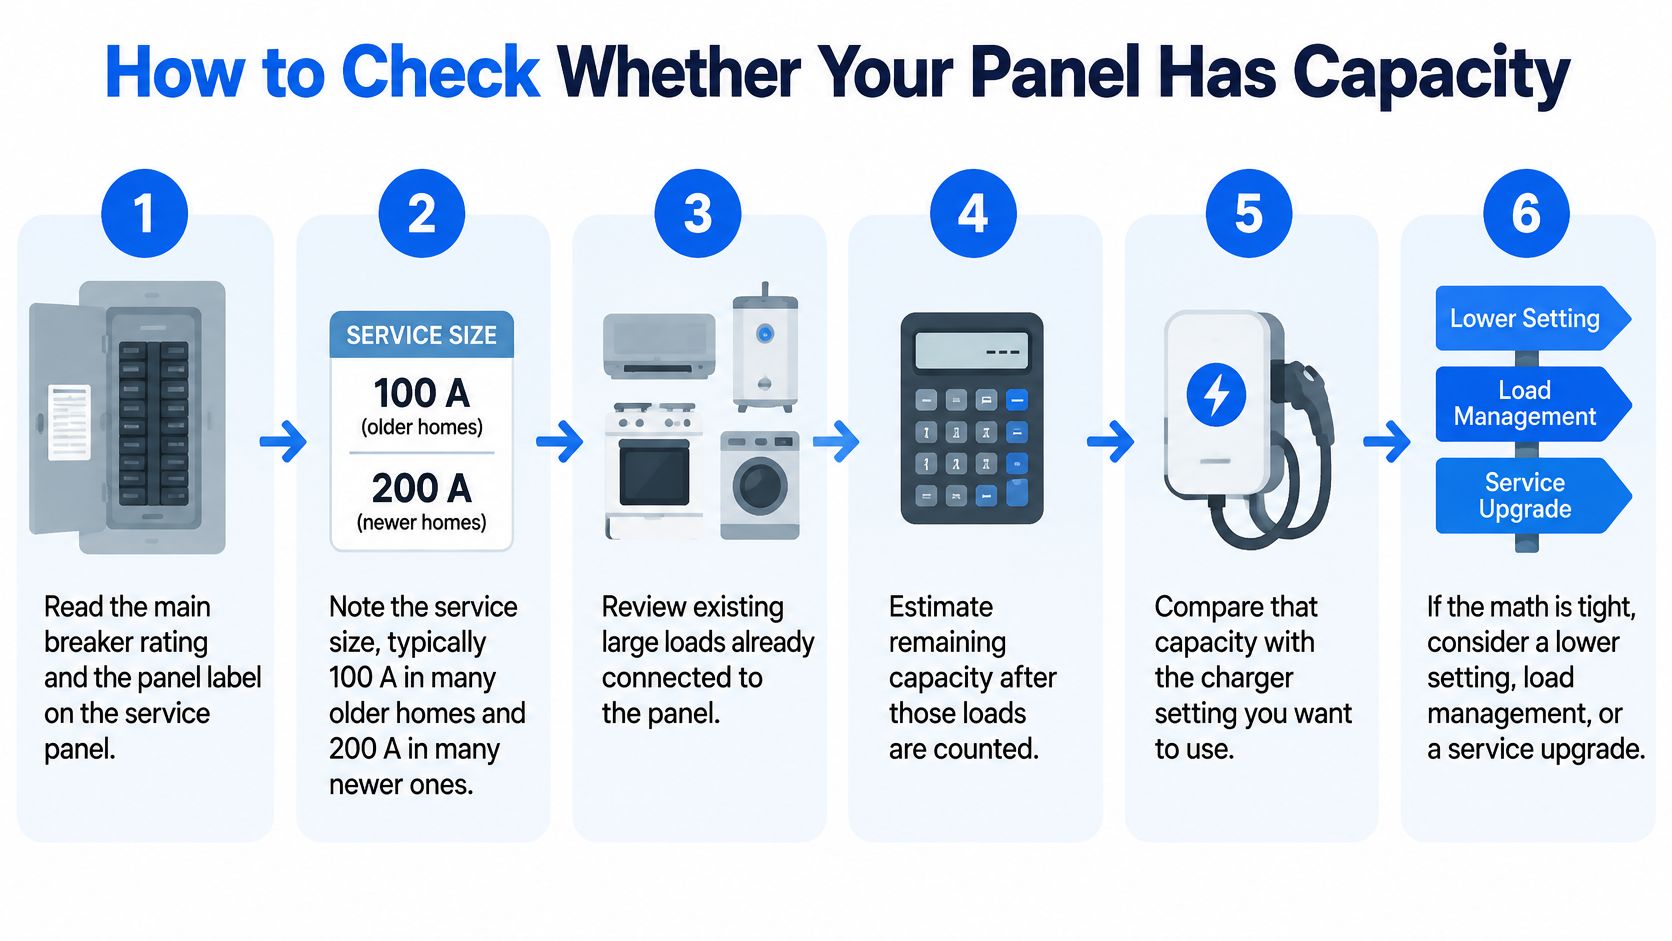
Read the main breaker and panel label. Photograph both. The label inside the door lists which breakers the panel accepts.
Record the service size exactly as labeled. The amperage marked on the main breaker is the only source that counts. Do not infer it from the home's age, the panel's physical size, or what a neighbor's house has.
List every large load by nameplate. Heat pump, electric water heater, range or cooktop, dryer, pool pump, battery system, generator. Write down each value from the equipment label, not a guess.
Run the dwelling load calculation. Use the standard or optional method in the electrical code, and count the charger at its configured load. If you want the mechanics, this walkthrough of electrical load assessment calculations shows how the numbers combine.
Confirm physical space. You need an open two-pole position for the new breaker and enough bus capacity behind it. Record what's available.
Compare and choose. If the calculated total fits under the service rating, the charger's full setting works. If it's tight, pick a lower configured setting or load management. If several large loads are coming, price a service upgrade.
A tight case, worked through
Take a home on 100-amp service with electric heat and an electric water heater. Those two loads alone claim a large share of the calculation before the car enters it, because heating equipment counts heavily under either code method. Add the charger's continuous load on top, and the total can pass the service rating even with open breaker positions available.
A lower configured setting reduces the counted load, and that reduction is often enough to bring the total back inside the service rating while still covering typical overnight charging. Load management reduces the counted load further, but only where the installed equipment supports it.
A passing result is a document, not a feeling. You should end with the service size, the itemized load list, the calculated total with the charger included, and the setting that total supports, all on paper your installer has confirmed.
Choosing Full Power, a Lower Setting, Load Management or an Upgrade
Most homes with spare calculated capacity can run 48 A on a dedicated 60-amp circuit and never think about it again. Homes with tight service usually do better with a lower setting or load management than with an expensive upgrade bought only for the car. The verdict depends on your calculation, not on the charger's maximum.
Option | Circuit needed | Main trade-off | Best when |
|---|---|---|---|
Full 48 A charging | Dedicated 60 A, two-pole circuit | Fastest charging at about 11.5 kW; needs panel capacity | Calculated load leaves room and no other large loads are planned |
Lower setting, such as 40 A or 32 A | 50 A or 40 A breaker to match the setting | Longer charging time; avoids an upgrade | Overnight charging covers daily driving and the panel is tight |
Dynamic load management | Dedicated circuit plus compatible monitoring equipment | Charging backs off when household loads rise | Equipment supports it and several large loads share the service |
Service upgrade | Larger service and panel as needed | Highest cost; leaves room for storage, heat pumps and future EVs | Powerwall, generator, electric HVAC or a second EV is planned |
Three situations
Spare capacity, light loads. A newer home with room in the calculation takes full 48 A. There's no reason to slow the charger down when the service can carry it.
Tight calculation, ordinary commute. A home with little headroom takes 40 A on a 50-amp breaker or 32 A on a 40-amp breaker. Each session runs longer, but the car plugs in at dinner and leaves full in the morning, so the slower rate never shows up in daily life.
More equipment coming. A home planning a Powerwall, a generator, electric HVAC, or a second EV is really planning a bigger electrical system. Upgrading the service first, then setting the charger, avoids paying to redo the work when the next load arrives.
Choose after the load calculation, not before it.
Load management sits between the second and third cases. It watches household demand and slows charging when the range, dryer, and heat run together, then speeds back up when they stop. It only works where the installed equipment supports that monitoring, so confirm compatibility before you count on it.
Code-Compliant Installation Checklist for 48 Amps
On a 48 A circuit, an inspector works through five items drawn from Article 625 of the National Electrical Code, the article covering electric vehicle power transfer systems. Pennsylvania municipalities adopt the NEC on their own cycles and layer on local amendments, so the edition in force and any extras come from the permit office when you apply.
The checklist
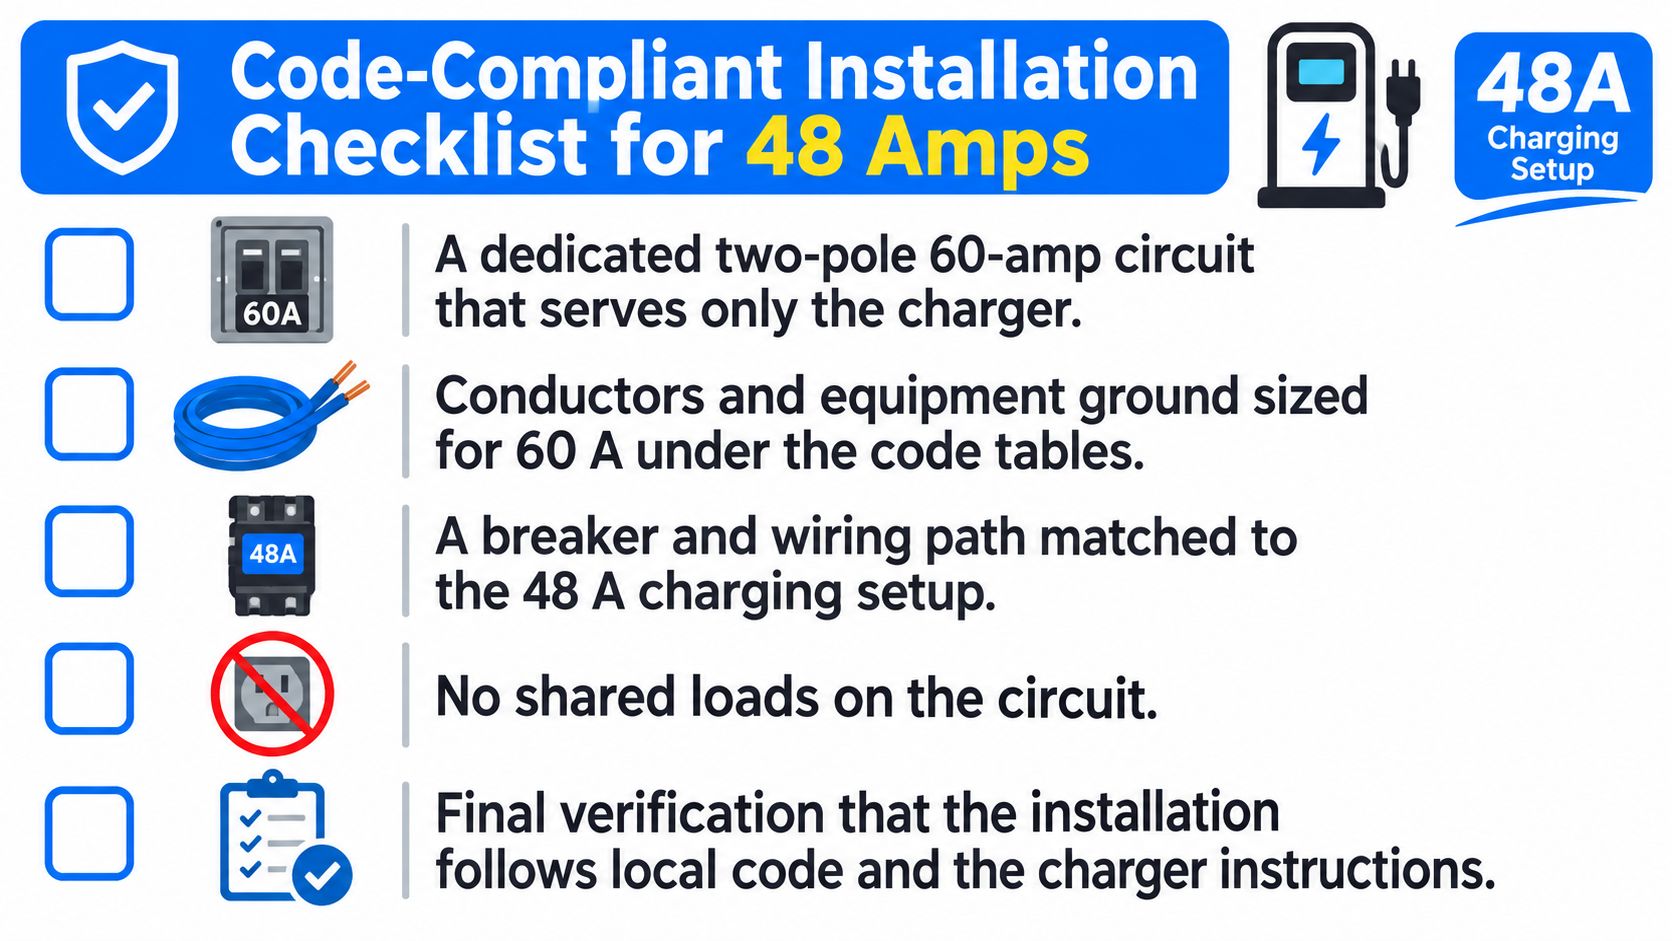
The circuit as installed. A dedicated two-pole 60-amp breaker feeding only the charger, with conductors and equipment ground sized under the 125% rule. The inspector verifies what is in the panel and conduit against what the permit describes, and confirms nothing else shares the run.
Rated location. Charger location and enclosure rated for outdoor or damp conditions where the unit mounts outside.
Ground-fault protection. Protection as the EV equipment rules require, with the charger's built-in protection confirmed with the inspector.
The permit timeline. Pulled before work starts, because an installation inspected only after the fact can mean opening finished work back up.
Final inspection and labeling. Sign-off on the completed work and the panel directory updated to identify the new circuit.
For a broader view of how these items fit together, see the overview of EV charger installation requirements.
Cases that add requirements
A detached garage raises questions about the feeder feeding that building and whether it can carry charging on top of its existing loads. An outdoor wall mount adds weather exposure to every connection. A shared multifamily property or workplace brings in questions about who owns the circuit, where disconnects go, and whose meter the energy runs through. Each case changes the inspection conversation, so raise it at permit time rather than at final inspection.
The inspector's sign-off is the documented proof that the circuit was installed to the rules in force. Keep it with your home records.
Common Mistakes That Trip Breakers or Fail Inspection
The most expensive mistake is adding a 60-amp circuit to a full service without a load calculation, then paying for the job twice when the correction turns into a service upgrade. The rest are cheaper, and each has a specific fix.
Setting mismatch: Charger configured above what its breaker carries. Match the setting to the breaker in the pairings table before energizing the circuit.
Undertorqued lug: A connection left loose at the breaker, disconnect, or charger. A 48-amp load can run for hours at a stretch, and a loose termination works like a small heater inside the panel. Torque every lug to spec.
Undersized wire: Conductor bought to save money instead of to carry the load. Size the wire for the 60-amp circuit, including run length and heat.
Empty slots mistaken for capacity: Charger added because the panel had open spaces. Slots say nothing about remaining amps; run the whole-home calculation before choosing a setting.
Mixed metals at terminals: Aluminum and copper joined without rated connectors. Use listed lugs made for the combination.
Bad charger placement: Cable stretched tight to reach the charge port. Mount the unit so the cable reaches with slack and no strain.
Skipped permit: Work done to save time. Pull the permit, or expect rework when the omission surfaces.
Setting drift after install: Configured current changed later without checking the breaker. Verify the charger setting matches the breaker after any change.
Reading a trip
A breaker that trips the moment charging starts points to a wiring or breaker fault. One that trips after hours of charging points to overload or heat building at a connection.
Repeated trips are the breaker doing its job. Resetting without finding the cause gives the fault another chance to heat up, so note when the trip happens and what was running. The timing pattern tells your electrician where to look first.
Record the Decision and Hand Off the Scope
A good handoff reads like a receipt for the arithmetic: 48 A continuous, the 60-amp breaker that carries it, wire and conduit chosen for the measured run, then the panel total that proves the service can support the load. Write those values down before anyone quotes, because a scope built from memory lets the charger setting, breaker, and load calculation drift apart.
Put the unknowns on the page
Installer contact. Name, license, email or phone, and who is responsible for the permit and inspection.
Measured route. Panel location, charger mount point, conduit path, approximate conductor length, and any heat or tight bends along the run.
Decision version. Date the load calculation was checked, and the single page the quote should follow.
Inspection plan. Who schedules it, which documents the inspector sees, and where the breaker directory and charger label end up.
A Tesla Certified Wall Connector contractor can price from that record without reopening settled choices, and for electrical upgrades can assess the current setup before recommending a panel upgrade or full service replacement.
If your panel math is tight, or you're weighing a lower Wall Connector setting against a service upgrade, Amp'd Energy Solutions can run the load calculation and install the dedicated circuit your home can support. Bring your panel photos and load list, and we'll turn them into a permitted, inspected 48-amp charging setup, or the right-sized alternative, for your Southeastern Pennsylvania home.
Comments