

Level 2 Charging Station for Home: A Practical Guide
Tuesday morning in Bucks County, the plan seems simple. You back your EV out, stop at the grocery store, and use the public Level 2 stall while you grab coffee. Instead, an internal-combustion vehicle is sitting in the charging space. The next two stations are occupied too, and your morning schedule starts slipping before you reach the highway.
That frustration is the hidden cost of depending on shared infrastructure. Availability changes, weather makes waiting unpleasant, and a station may begin charging idle fees after its grace period. Every minute spent circling or standing by is a minute your car could have been charging in your own garage or driveway.
A properly scoped level 2 charging station for home gives you control over the part of EV ownership you use most often. The key decision isn't which charger has the most impressive box or app. It's whether your home's electrical backbone can safely carry the load, whether the installation needs load management, and whether your panel can support the circuit without an unnecessary upgrade.
Table of Contents
The Morning Your Public Charger Was Occupied - The cost of waiting
What a Level 2 Charging Station Actually Does - Why the circuit matters more than the label - Charging levels at a glance
Why Home Level 2 Charging Has Become the Default - What you're paying for
Walking Your Property Before You Pick a Charger - Start at the service entrance - Follow the proposed circuit path
The Panel Question Most Homeowners Get Wrong - What the electrician needs to know - Panel readiness options for home Level 2 charging
Mounting, Placement, and Installation Timeline: What to Expect - Indoor and outdoor details - Where the schedule expands
Choosing the Right Charger for Your Home - Match the equipment to the installation
The Morning Your Public Charger Was Occupied
The homeowner in this example doesn't have a broken vehicle or an unusually demanding commute. The problem is dependence. A public charger works when the space is available, the equipment is operating, the connector is accessible, and another driver hasn't decided to treat the stall as general parking.
Home charging changes that equation. You plug in after dinner, the car charges while you're asleep, and you leave in the morning without adding a separate fueling stop. The charger becomes part of the property, not another stop on your route.
The cost of waiting
Public charging can still serve long trips and households without a practical parking location. It shouldn't be the foundation of every weekday charging routine if you have a garage, driveway, or suitable exterior wall.
Shared stations expose you to problems you can't solve from the driver's seat:
Uncertain access: An occupied stall can turn a quick top-up into a search across several locations.
Idle charges: Some public networks impose fees when a vehicle remains connected beyond the permitted grace period.
Weather exposure: Rain, snow, ice, and cold make an otherwise simple charging stop less convenient.
Schedule friction: You have to plan around station availability instead of charging when the car is already parked.
The practical fix is residential Level 2 charging, but don't start by ordering hardware. Start at the electrical panel. The installation may require a dedicated two-pole circuit, and the charger's continuous demand must fit the home's available capacity under the applicable electrical rules.
Practical rule: Buy the charger only after an electrician has confirmed the circuit, service capacity, conductor route, and installation location.
For many homeowners, the most important question is whether the panel can carry a 40 to 50 amp charging setup without crowding out the range, dryer, heat pump, water heater, or other large loads. Sometimes the answer is a straightforward circuit installation. Sometimes it calls for managed charging. Sometimes an upgrade is unavoidable. The rest of the decision follows from that assessment.
What a Level 2 Charging Station Actually Does
A Level 2 station is a controlled connection between your home's electrical system and the vehicle. It uses 208 to 240 volt AC power, the same general type of split-phase residential power used by equipment such as an electric dryer or oven. A dedicated breaker feeds the branch circuit, which supplies the EVSE, the equipment that manages the connection and communicates with the vehicle.
The charging handle plugs into the vehicle's inlet. Depending on the car and station, that connection uses a J1772 or NACS interface. The vehicle's onboard charger then converts incoming AC power into the DC power stored in the battery. A residential Level 2 station does not bypass that onboard charger, so the vehicle's acceptance rate matters as much as the station's advertised output.
Why the circuit matters more than the label
Residential Level 2 stations typically operate across a range of roughly 7 kW to 19.2 kW on 208 to 240 V circuits, according to the U.S. Department of Transportation's EV charging basics. Actual charging speed depends on the branch-circuit amperage, the station's setting, and the maximum power the vehicle can accept.
The panel and circuit determine whether that output is practical for your property. Charging is a continuous load, so an electrician must account for sustained operation rather than treating the station like an occasional appliance. The breaker, conductors, terminals, disconnecting equipment, and panel must all be selected and installed for that demand.
That assessment comes before charger shopping. A station with a higher advertised output does not help if the vehicle cannot accept it or the home's service cannot safely support the circuit.
Level 1 charging uses a standard 120 V receptacle and suits drivers with light daily mileage or plug-in hybrids. DC fast charging is a separate category, usually found in public settings, because it supplies direct current and bypasses the vehicle's onboard AC charger. Level 2 sits between those options, providing overnight replenishment without requiring commercial-scale equipment.
Charging levels at a glance
Level | Voltage / Typical Circuit | Miles of Range per Hour | Best Use Case |
|---|---|---|---|
Level 1 | 120 V household receptacle | Slower, vehicle and conditions dependent | Light daily driving or plug-in hybrids |
Level 2 | 208 to 240 V, dedicated circuit | Vehicle and charger dependent | Routine home charging overnight |
DC fast charging | Commercial-scale direct-current equipment | Rapid public charging, vehicle dependent | Road trips and urgent top-ups |
A Level 2 station can deliver enough energy for most major EV models to cover up to about 250 miles during a 10-hour overnight charge, based on Argonne National Laboratory's charging infrastructure guidance. Your vehicle may receive less, but the example shows why Level 2 fits ordinary overnight charging. The right installation starts with panel capacity and circuit design, then ends with station selection.
Why Home Level 2 Charging Has Become the Default
A public charger can be occupied when you need it, while a home station is ready at the end of every workday. That reliability explains why home charging has become the normal arrangement for EV owners, not a decorative upgrade.
The U.S. Department of Energy projects a need for 28 million EV charging ports by 2030. Of those, 25.7 million, or 92%, are expected to be private Level 1 or Level 2 chargers at single-family homes. Its DOE forecast also estimates that 64% of EV charging happens at single-family homes using Level 1 and Level 2 charging.
The practical lesson is straightforward. Residential charging carries the daily load, and Level 2 is the sensible upgrade when a basic outlet cannot restore enough energy between trips. Before you shop for a station, confirm that the service, panel, and proposed circuit can support it.
What you're paying for
The wall-mounted box is only one part of the project. A professional installation may include:
Charging equipment: The EVSE, cable, handle, mounting hardware, and any required disconnecting equipment.
Dedicated branch circuit: The two-pole breaker, conductors, conduit, fittings, and terminations.
Installation labor: Routing conductors, securing the equipment, configuring the charger, and testing it under load.
Permitting and inspection: Local approvals and the final inspection required for compliant work.
Site complications: Finished walls, masonry, detached structures, long conduit routes, or limited panel space.
A national reference puts the average U.S. installation cost for a faster Level 2 home charger at about $1,800, including equipment and installation. Southeastern Pennsylvania homes vary considerably by construction style and electrical service. A charger beside an adequate panel is a different job from one mounted on a detached garage across a paved drive.
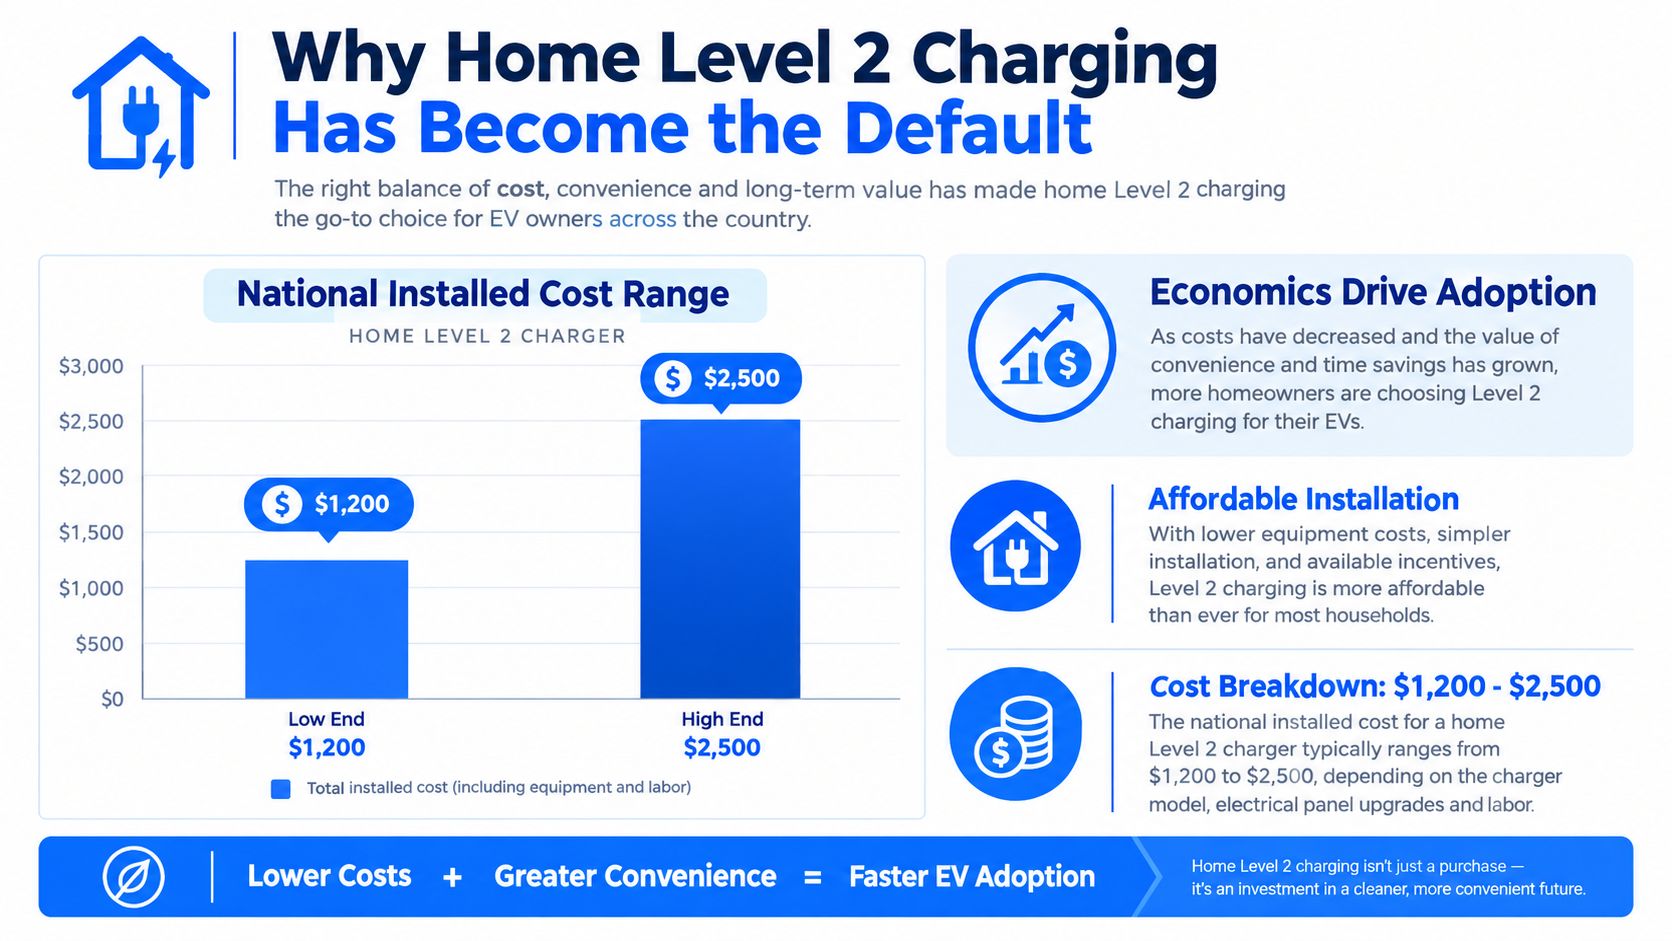
The main operating benefit is convenience, with energy cost as a secondary consideration. Home charging lets you schedule charging around household routines, coordinate it with future energy equipment, and stop making each morning depend on an available public stall.
That convenience depends on sound electrical work. A load calculation, suitable panel, correctly sized conductors, required overcurrent protection, and proper permitting matter more than a station's advertised output. If the existing service cannot carry the added continuous load, a service or panel upgrade may be required before installation. Start with the property and electrical system, then choose the station that fits them.
Walking Your Property Before You Pick a Charger
Don't shop from the vehicle's maximum charging specification. Walk the property first. The route from the service equipment to the car, and the electrical capacity behind that route, will determine which charger makes sense.
Start at the service entrance
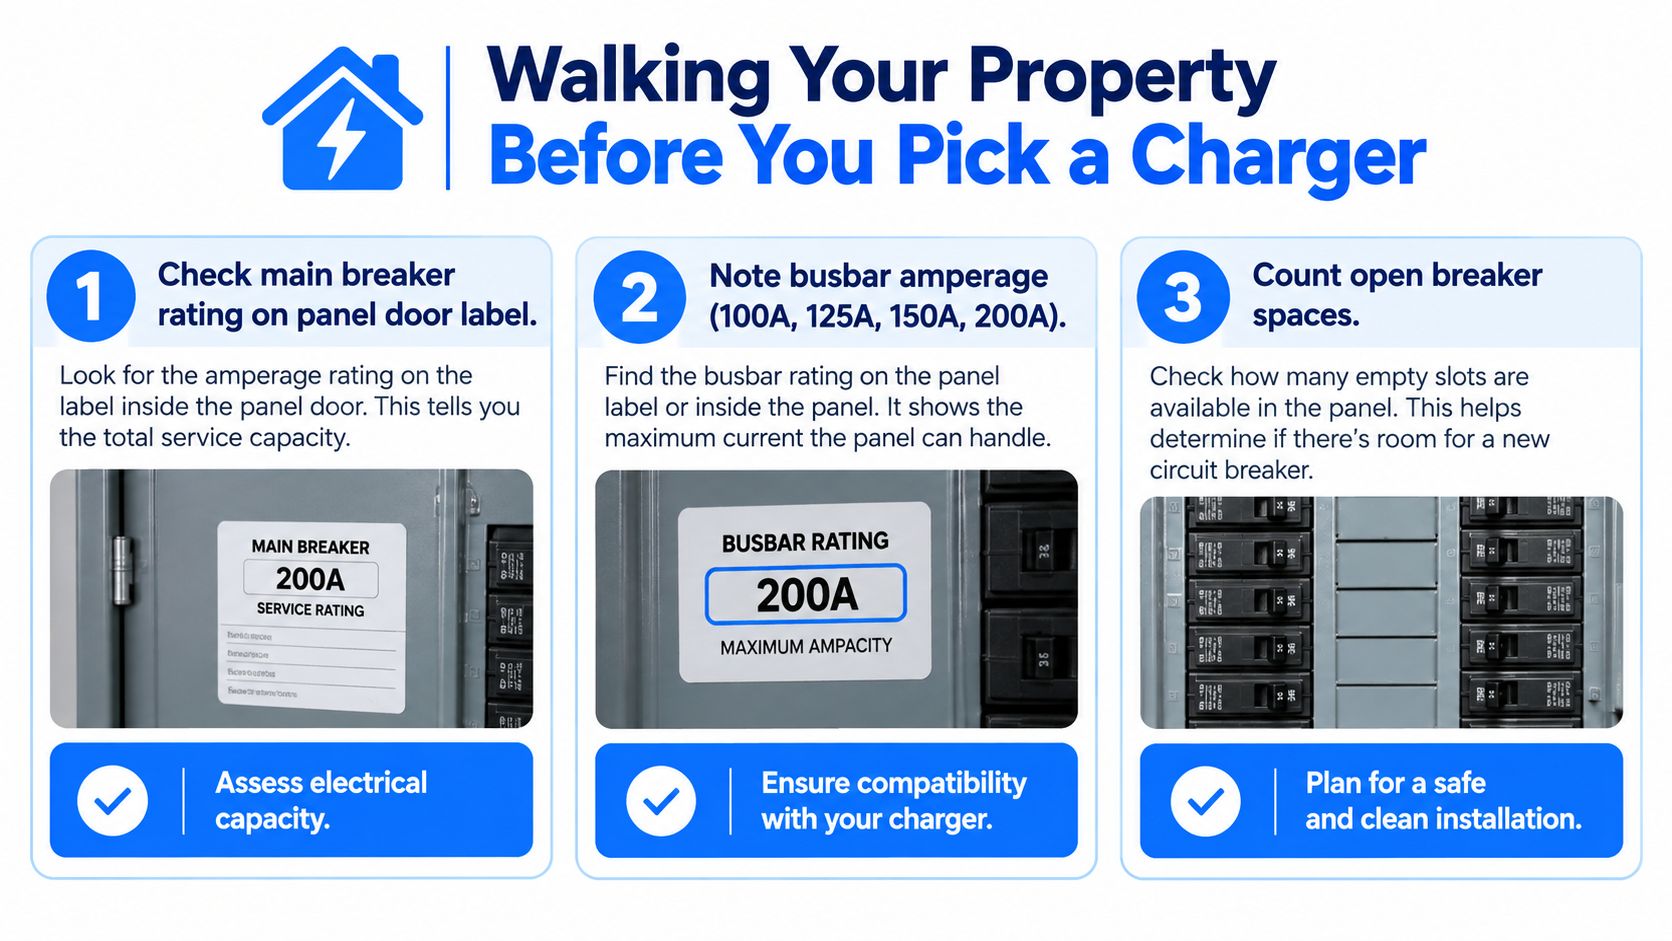
Open the panel door, but don't remove the dead front or reach inside. Read the main breaker rating printed on the panel and identify the service equipment rating. Note the busbar rating if it appears on the labeling, then look for usable space for a two-pole breaker.
A panel with open spaces isn't automatically ready. A full panel isn't automatically disqualified either. The electrician needs a load calculation and must verify that the equipment is listed for the proposed breaker and conductors.
Check for warning signs while you're documenting the panel:
Old or damaged equipment: Rust, heat discoloration, loose covers, or missing labels deserve attention before adding a continuous load.
Crowded wiring: A packed gutter or poorly organized panel can affect how the work is planned.
Large existing loads: Electric heat, a range, dryer, heat pump, and water heating can consume meaningful capacity.
Limited breaker space: Tandem breakers or improvised solutions aren't substitutes for a compliant two-pole installation.
Follow the proposed circuit path
From the panel, trace the route to the garage or driveway. Finished drywall, stone veneer, brick, attic access, crawl spaces, and underground runs can all change the labor and material requirements. A detached garage may need a separate approach, and an exterior wall may require weather-rated equipment and careful conduit placement.
At the mounting location, check whether the wall can support the station and cable tension. Keep the handle reachable without crossing a doorway or creating a trip hazard. Open and close the vehicle doors, then picture the cable extending from the charger to the inlet.
Finally, walk the route with your phone and test wireless reception at the proposed equipment location. Connectivity isn't required for every installation, but it matters if the charger needs scheduling, remote status, firmware updates, or dynamic load management.
For a more formal record of the home's condition, use an electrical assessment report before requesting final installation pricing. That documentation can help separate an ordinary circuit installation from a project that needs service work.
The Panel Question Most Homeowners Get Wrong
Many homeowners hear “Level 2” and assume they need a 200 amp service upgrade. That conclusion is too quick. A 100 amp or 125 amp service may not have room for an unmanaged high-amperage charger, but the correct answer comes from the home's calculated load, not the number printed on the charger carton.
Dynamic load management creates the middle path. A compatible system monitors the home's demand and reduces EV charging output when other large appliances run. When household demand falls, it can allow charging to increase again. Recent coverage of this approach describes load management as a way some homeowners may avoid a service upgrade, while still applying dedicated-circuit and continuous-load requirements, as discussed in this recent reporting on EV load management.
What the electrician needs to know
The important question isn't “Can my panel handle a 48 amp charger?” It's “What does my home already draw, and what happens when charging overlaps with those loads?”
An electrician should account for the service rating, panel rating, existing breakers, major appliances, heating equipment, and proposed charger setting. If the calculation leaves adequate capacity, a dedicated circuit may be appropriate. If it doesn't, the options include reducing the charging rate, installing an approved load-management system, adding a subpanel where suitable, or upgrading the service.
A smaller charger that runs reliably every night is more useful than a larger charger that forces an avoidable service project.
A load-managed installation still needs proper circuit sizing and equipment compatibility. The technology doesn't excuse undersized conductors, an unsuitable breaker, poor terminations, or unpermitted work. It changes how the home shares available capacity.
Panel readiness options for home Level 2 charging
Solution | Existing Panel | When It Applies |
|---|---|---|
Dedicated Level 2 circuit | Adequate calculated capacity and suitable breaker space | The panel can support the continuous charging load |
Lower-amperage charger | Limited spare capacity | Daily driving can be covered without maximum output |
Dynamic load management | Capacity varies with household demand | Charging can throttle while major appliances operate |
Subpanel or distribution changes | Main panel has constraints but the service can support the project | The layout needs reorganizing rather than a full service replacement |
Service or panel upgrade | Existing equipment lacks capacity or condition | The calculated load and future plans exceed what the system can safely provide |
Don't treat an upgrade as a sales conclusion or a failure. Sometimes older equipment, planned battery storage, electric heating, or generator integration makes additional capacity sensible. Other times, the upgrade is unnecessary because the home can use managed charging. A proper home electrical panel upgrade assessment should explain which condition applies and why.
Mounting, Placement, and Installation Timeline: What to Expect
A charger can meet every electrical requirement and still be installed in the wrong spot. Mount it where the cable reaches the vehicle without crossing a walkway, wrapping around a door, or hanging near tires and sharp edges. Placement affects daily convenience and protects the cable from avoidable damage.
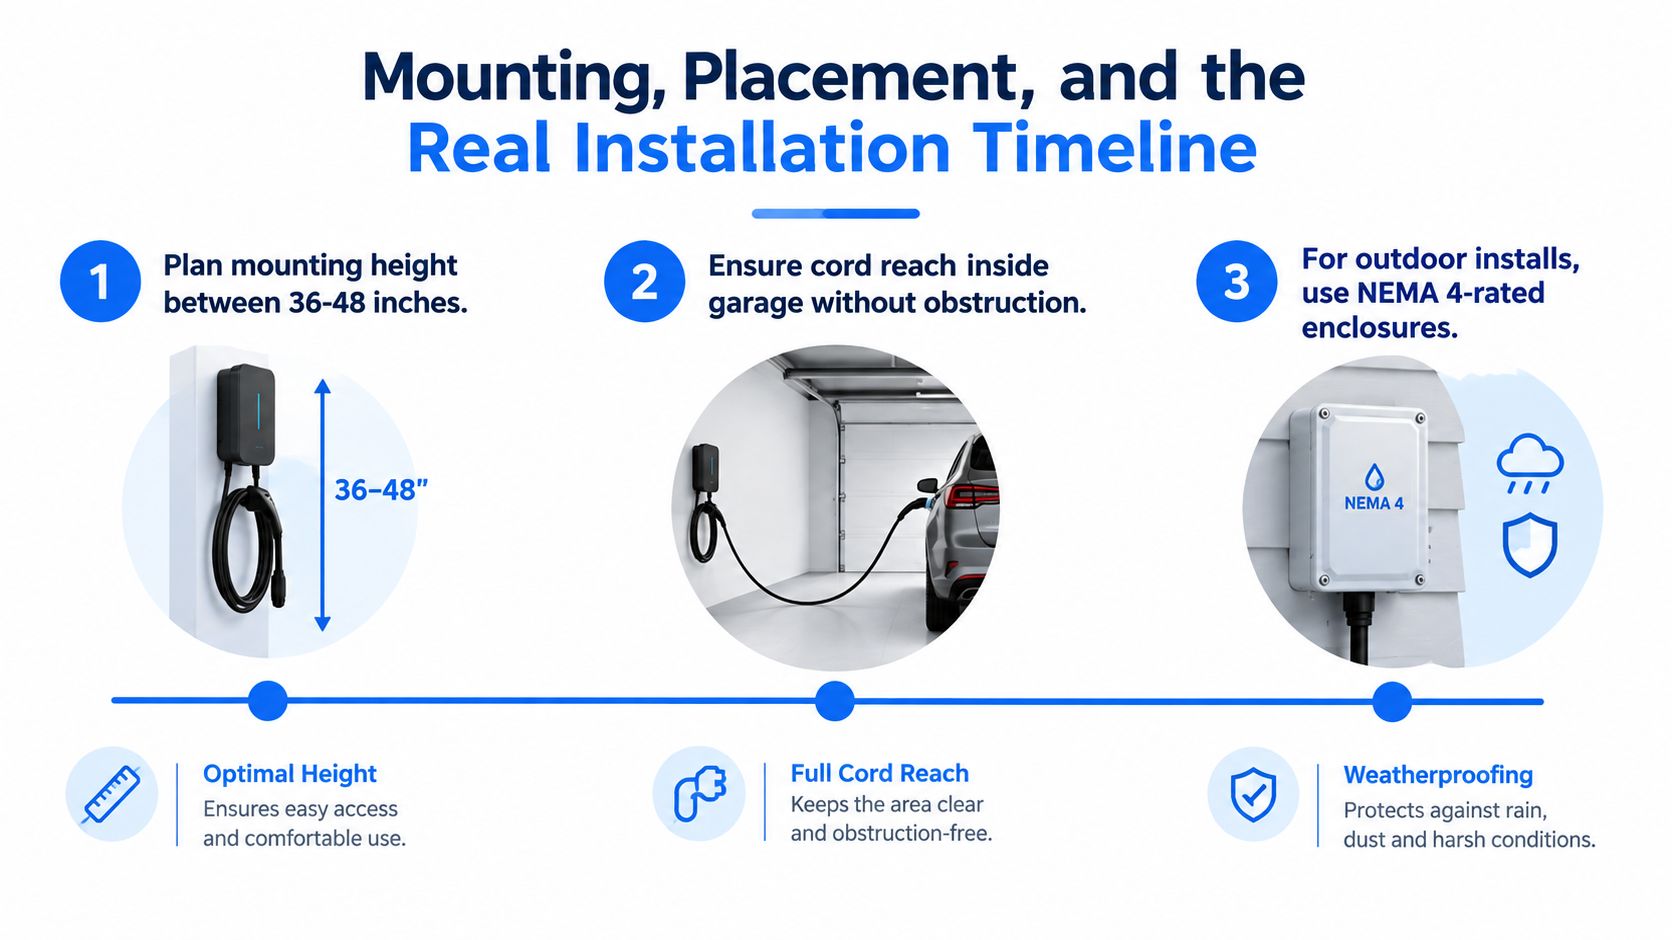
In a typical garage, position the connector roughly 36 to 48 inches above the floor. Adjust that height for the vehicle inlet, the wall layout, and local requirements. Leave room to remove the handle without twisting the cable. Keep the unit clear of car doors, storage cabinets, and garage tracks that could strike it.
Indoor and outdoor details
Outdoor work requires equipment and mounting methods suited to exposure. Use an outdoor-rated enclosure, protect the circuit and disconnecting means as required by the local authority, and fasten the charger to a surface that can handle weather and cable tension. Masonry may require different anchors than a framed garage wall. A detached structure may also require additional planning for the feeder and grounding arrangement.
In Southeastern Pennsylvania, the physical wiring may take one workday after the project is approved and scheduled. The overall calendar often takes longer because the contractor must complete the site assessment, prepare the written quote, process the permit, schedule inspection, and coordinate with the utility when required. The local authority and utility territory control much of that timing. Get a written sequence of steps instead of a promise based only on mounting and wiring time.
Where the schedule expands
Site assessment and quote: The contractor confirms the panel, cable route, mounting location, and charger configuration.
Permit review: The local township or city reviews the electrical scope before work begins.
Installation: The electrician installs the circuit, equipment, labeling, and required protective components.
Inspection: The authority checks the completed work before the project is closed.
Utility coordination: A service change or specific utility requirement may add another review.
A clear EV charger installation process should state who handles permits, who schedules the inspection, and whether utility communication is included. Ask before comparing quotes. A low number that excludes approvals does not represent the complete project cost.
Choosing the Right Charger for Your Home
Once the panel and site are ready, charger selection becomes straightforward. Match the equipment to the circuit your home can safely provide, not to the highest amperage advertised.
A higher-amperage charger makes sense only when the vehicle accepts that power, the household load calculation supports it, and the added speed serves a real driving need. Many households don't need maximum overnight output. A lower setting can replenish ordinary daily driving while leaving more room for existing appliances or future energy equipment.
Match the equipment to the installation
Specification | What to Match It To | Common Pitfall |
|---|---|---|
Maximum charging amperage | Circuit rating, continuous-load requirements, and vehicle acceptance | Assuming a larger number automatically means a better installation |
Cable length | Parking position, inlet location, and safe walking paths | Choosing a short cable that forces awkward mounting |
Enclosure rating | Indoor or outdoor mounting location | Installing indoor-rated equipment outside |
Connectivity | Scheduling, software updates, and load-management requirements | Paying for network features the household won't use |
Connector type | The vehicle's inlet and any approved compatibility needs | Treating connector choice as a substitute for electrical planning |
Installation method | Weather, inspection expectations, and desired permanence | Choosing a plug-in setup without considering outlet quality and exposure |
Hardwired equipment is often the cleaner choice for an exterior Southeastern Pennsylvania installation because it removes the exposed receptacle from the charging path. A plug-in station can be appropriate when the receptacle, breaker, conductors, cover, and mounting arrangement are all designed for sustained EV charging.
Choose a unit with appropriate listing, outdoor protection where needed, a cable that reaches the vehicle comfortably, and a warranty supported by the installer. Wi-Fi is useful when the project requires managed charging or scheduled energy control. Otherwise, a non-connected unit may meet the need without adding unnecessary complexity.
Amp'd Energy Solutions provides home EV charger installation for different vehicle makes and models, including dedicated circuits and panel-readiness assessments. If your property also needs service work, battery backup planning, or generator coordination, those questions can be evaluated as part of the same electrical project.
Schedule a panel and site assessment with Amp'd Energy Solutions before you buy a charger. Their Southeastern Pennsylvania team can evaluate circuit capacity, plan the safest route, and install a Level 2 charging station that fits your home rather than forcing your home to fit the hardware.
Comments